Voopoo Drag 2
9.3
PROS
- Fires up to 177W
- Beautiful, Comfortable Design
- Power and Temperature Control Modes
- Great Battery Efficiency
- Included UFORCE T2 Tank Is Great & Leak Free
CONS
- Battery Door Wiggles A Bit
- FIT Mode Has No Noticeable Difference From Wattage Mode
It’s the follow-up that we’ve all been waiting for: the Voopoo Drag 2. Ever since the enormous success of the original Drag the vaping community have been anxiously awaiting an update, and that day has finally come.
The Drag 2 kit comes with the UFORCE T2 sub-ohm tank, and it’s compatible with the whole range of UFORCE coils. It also has a 5ml max capacity.
Having used the original Drag extensively over the last year as one of my go-to mods, I have a good idea of what’s new and what’s changed. I also have a good idea of what improvements I want to see.
In this Voopoo Drag 2 kit review, I’m going to go over everything that you need to know about this latest addition to the Drag family. I’ll also go over the UFORCE T2 tank.
Voopoo Drag 2 Kit Review — What You Need To Know
What’s in the Box
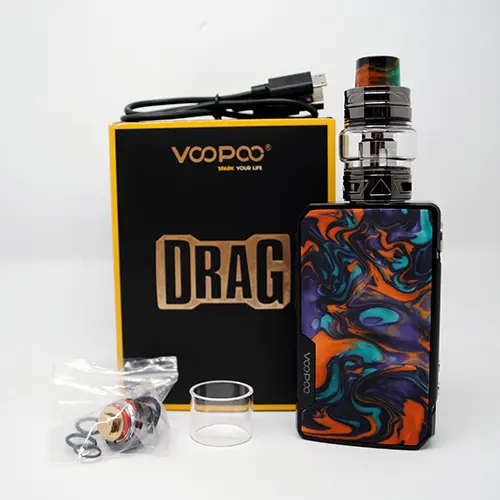
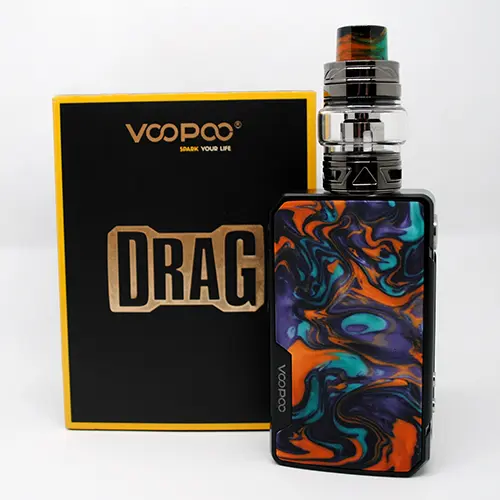
The Drag 2 comes in a nice square box, with DRAG embossed on the front sleeve. When you open it up you get:
- 1 x Drag 2 177W Mod
- 1 x UFORCE T2 Sub-Ohm Tank
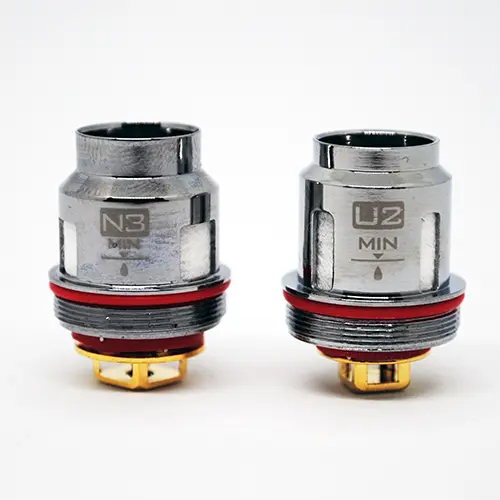
- 1 x 0.40ohm U2 Coil
- 1 x 0.20ohm N3 Coil
- 1 x Replacement Glass
- 1 x USB Cable
- 1 x Spare Parts
- 1 x User Manual
- 1 x Warranty Card
Specifications — Voopoo Drag 2 Mod

- GENE FIT Chip
- Powered by Dual High-Drain 18650 Batteries
- Supports Power, Temperature Control, and Memory Modes
- Fires at up to 177W
- 0.91 Inch OLED Display
- Firmware Upgradeable
Specifications — Uforce T2 Sub-Ohm Tank
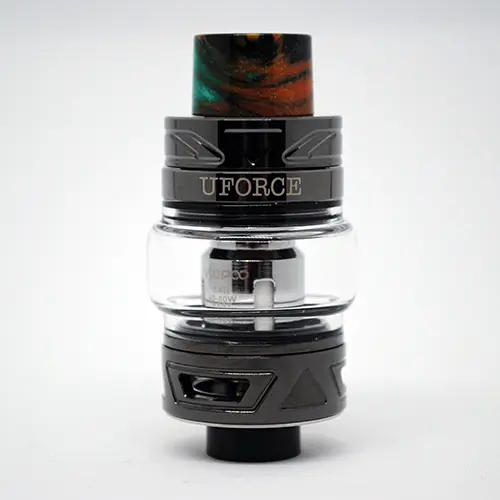
- 24.6mm Diameter Base
- Compatible With UFORCE Coil Family
- 3.5ml Standard Capacity
- 5ml Capacity W/ Included Bubble Glass
- Three Bottom Airflow Slots (Adjustable)
- Wide 14mm Bore, 810 Drip Tip (Resin)
Design & Build Quality — Voopoo Drag 2
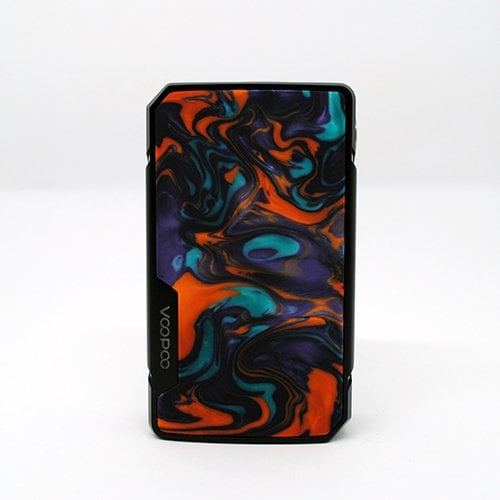
Immediately upon taking the Drag 2 out of the box, you notice that the design is very similar to the original Drag. However, instead of a boxy shape with straight corners, the Drag 2 has beveled edges that feel nice to grip in your hand. It also has slightly curved front and back plates and this makes it comfortable to hold. Ergonomically, the Drag 2 feels great and is a huge improvement over the sharp-cuts of the original.
Another huge improvement on the Drag 2 is the paint quality. I’ve had no chipping or flaking, even on the bottom of the device. The original Drag was notorious for its terrible paint quality, and it was a large flaw in an otherwise amazing mod. Thankfully, this appears to have been fixed, as the paint has held up great on my Drag 2.
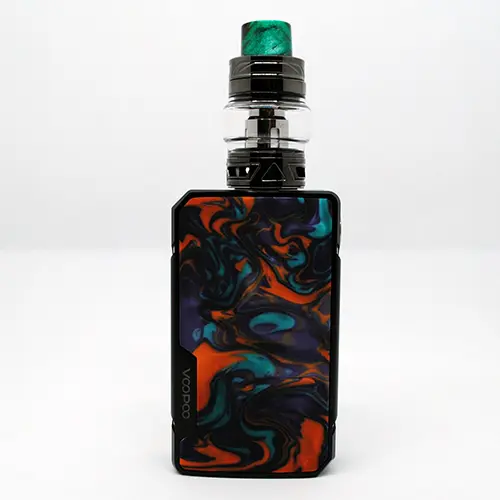
 The resin on the front panel of the Drag 2 is very soft and smooth. The “Dawn” resin unit that we tested is a beautiful mix of orange, purple, and a dark turquoise that give the device a gorgeous and sophisticated look.
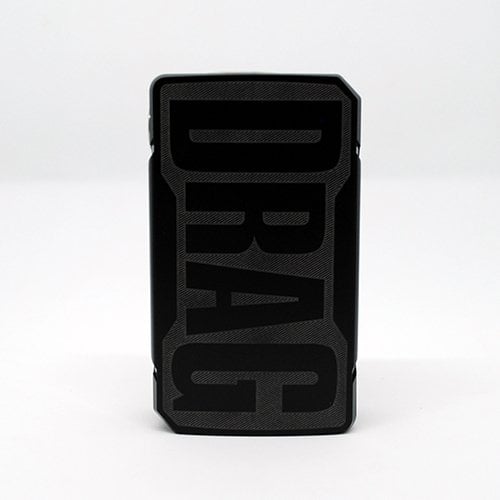
The back panel, which is also the battery cover, is emblazoned with the familiar “DRAG” logo that we’ve all come to know. Compared to the Drag, the logo on the Drag 2 is much darker and less noticeable, and also isn’t textured. I rather like this change, as I thought that the logo on the original stood out a little bit too much. The more subtle, dark logo looks much better to me.
The battery cover is attached by two strong magnets, and fits to the body of the device nicely. However, there is a little bit of wiggle room and so the battery cover does shift a bit in your hand during use. This is a little bit annoying, but not a huge deal. I can live with this one.
The battery compartment of the Drag 2 is very nice and clean, and uses spring loaded contacts. There is also a ribbon to allow you to easily remove your batteries. The positive and negative indicators are still black though. I wish they would at least paint these in white, but overall the build quality here is just as good as the rest of the mod. Looking good so far.
 A nice change on the Drag 2 is its centered 510 connector. Tanks just always look better when they’re centered, rather than off to the side. I’m glad that Voopoo listened to the community and reviewers on this one.
There are three buttons on the Voopoo Drag 2: one large circular firing button, and two small adjustment buttons. The fire button is firm and nicely recessed for easy use, and works with just the right amount of pressure. The adjustment buttons are flat and rather tiny, but they are easy to use and work just fine. Below the adjustment buttons is a Micro-USB port for firmware updates.
 The screen on the Drag 2 is a nice size at 0.91 inches and very crisp. It’s just bright enough when used indoors, however it can be a little dim when used outside. But if you upgrade the firmware on your Drag 2, you will have the option of adjusting the brightness. The Drag 2 will display basic vaping information such as: resistance, voltage, puff time, and wattage/temperature. Compared to the original Drag, the screen on the Drag 2 sits flush with the mod and is not recessed. Again, a welcome change.
When it comes to design, the Drag 2 is more clean and modern looking than its predecessor. The soft curves and beveled edges make it much nicer to hold and use, and the darker Drag logo makes the device blend better with the resin panel.
As for build quality, the paint on the Drag 2 is amazing and has held up without sign of flaking or chipping. The device is really well put together, and the buttons work marvelously. All-in-all, it seems like Voopoo took an already great device, eliminated the pain-points and flaws, and created the Drag 2. This device is looking good.
Design & Build Quality — Uforce T2 Sub-Ohm Tank
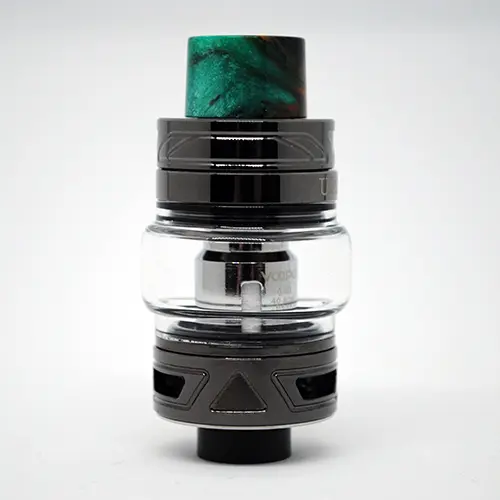
The UFORCE T2 tank is a sub-ohm tank with a 24.6mm base diameter. In terms of size and proportions, it looks perfect sitting atop the Drag 2. It even has a resin drip tip that matches the resin patterning of the mod, which is really neat. This drip tip is 14mm in diameter so it’s pretty wide bore, and is an 810.
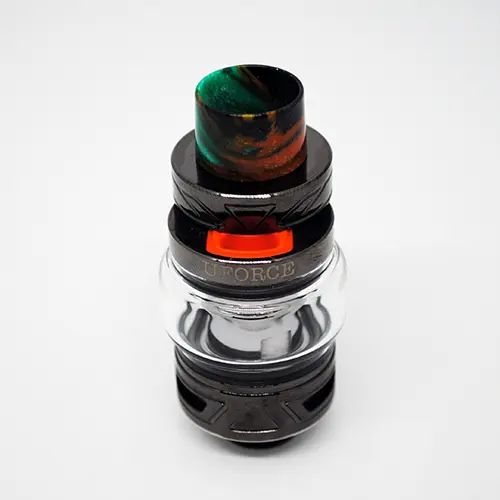 The top cap on the UFORCE T2 slides open for easy filling. There’s an arrow directly above the UFORCE branding that lets you know where to push to slide it open. There is a silicone lining to ensure a proper seal and to prevent leaking, and the fill port is wide enough to accommodate dropper nozzles. I didn’t have a problem filling the tank, and found that it filled rather hassle-free and easily.
The UFORCE T2 comes with two glass tank sections: one is a 3.5ml capacity and the other is a 5ml max capacity. I don’t know about you, but I know which one I’m using! The 5ml gives you the freedom to fill up and not have to worry about refilling again for quite some time. This is great for long trips, or when you’re just out and about.
 There are three airflow slots on the UFORCE T2, and they are medium sized and fully adjustable. Although the airflow is positioned on the bottom of the tank, there was absolutely no leaking whatsoever. Whether I filled the tank with the airflow open or the airflow closed, I never had any leaking. This is amazing, and I wish every tank was as leak-free as this one.
Coils
The best part about the UFORCE T2 is that it is compatible with the entire UFORCE coil family. There are currently ten different coils that you can use with the UFORCE T2, ranging from 0.13ohm all the way up to 0.60ohm. And not only do you get a varying choice of resistances, but you also get to choose single, double, or triple coils, as well as regular or mesh coils. For pre-built coils, the UFORCE family offers some of the most diverse ranges in the industry.
Included with the Drag 2 Kit, you get two coils: one U2 0.40ohm dual coil, and one N3 0.20 triple mesh coil. The U2 0.40ohm coil is a regular dual coil, and is rated for 40-80W. Voopoo state that it will function best 55-65W.
The N3 0.20ohm coil is a triple mesh coil, so you’ll be getting more massive flavor and clouds out of this coil due to the increased surface area. This coil is rated for 65-100W, however Voopoo suggest a recommended range of 75-85W for optimal performance.
Features and Functions of the Voopoo Drag 2

The Drag 2 is powered by the new GENE FIT chip, which is an update to the Gene chip found on the original Drag. As mentioned previously, the Drag 2 requires two high-drain 18650 batteries to function. The device turns on or off with five clicks on the fire button.
With the Drag 2, you get a few options for modes: Power Mode, Temperature Control Mode, and five Memory Modes. The Drag 2 will fire at up to 177W in Power Mode, and will support SS, NI, and TI from 200-600F in TC.
The most interesting feature about the Drag 2 has got to be the “FIT” menu. There are three settings, and each one provides a different level of power to your coil. Finding out what each one did was almost impossible, as it isn’t listed anywhere in the manuals, but I did find the following information on the Voopoo website:
FIT 1: Battery Saving Mode
FIT 2: Maximum Flavor Mode
FIT 3: Maximum Clouds Mode
As far as I can tell, it just seems to increase the power to your coil. I noticed maybe a slight difference from FIT 1 to FIT 3, but nothing remarkable. I’m hoping that they clarify and provide more information on this mode in the near future.
Voopoo Drag 2 Button Combinations
Lock Device: Hold the + adjustment button and the fire button. “LOCK” will appear. The fire button as well as the adjustment buttons are now locked. To unlock, do the same. “UNLOCK” will appear.
Flip Screen Orientation: Hold the – adjustment button and the fire button. This will flip the orientation of the screen.
Change Modes: Press the fire button three times. This will allow you to switch between Power, FIT, and Temperature Control modes.
Memory Mode/Check Serial Number: Hold the – and + adjustment buttons together. This will take you into a menu that will allow you to access memory modes. You can also view your serial number of your device and firmware version.
Temperature Control – Change Wattage: Once in Temperature Control Mode (by pressing the fire button three times until in TC mode), press the fire button four times. Now you can change your wattage.
Temperature Control – Set Resistance: Once in TC Mode, hold the + and – adjustment buttons. This will take you into a menu. The third option will allow you to set your resistance using the adjustment buttons.
Performance
In the performance department, the Drag 2 is certainly no slacker. It sports a slightly higher maximum wattage than its predecessor at 177W — a 20W increase. This is thanks to the new GENE FIT chip, but I was curious to see how it would perform.
I tested the Drag 2 using both the included coils on the UFORCE T2, as well as with a few different builds on RDAs.
To start, the battery efficiency of the Drag 2 is very good. It seemed to manage power much better than some other dual battery mods, even when using it at higher wattages.
With the UFORCE T2 tank and the 0.40ohm coil, I found the vape to be very pleasant but light. The vapor was not very dense, but the flavor was good. Hitting it at around 65W, it wasn’t strong or dense enough for me personally. But it was very smooth, and fired the moment you fired the mod.
The 0.20ohm N3 coil was the better coil by far, and was much more enjoyable and flavorful. This is because the N3 coil is a triple mesh coil, and thus the increased surface area leads to more vapor, and better flavor. I found the vapor to be dense and very tasty at around 75-85W, which is also the range recommended by Voopoo.
Temperature Control vaping is also great with the Drag 2, just as it was with the original. Aside from DNA chips, the GENE chip was known as being the next best chip for TC.
The FIT Modes just seemed to provide Bypass mode, but with a boost at the higher levels 2 and 3. I found that it was just the same to use wattage mode rather than the FIT modes, and decrease or increase the wattage. However, you may prefer to use this mode as it is more simple and straightforward to use. You don’t have to change settings or worry about wattage, simply adjust the the FIT settings up or down for a hotter or cooler draw.
In my testing the GENE FIT chip didn’t disappoint, and performed amazing in TC mode for stainless steel and titanium. I didn’t have a chance to test it with NI coils, but I assume it will perform just as great. No complaints from me in the TC department, that’s for sure.
The Drag 2 is a mod with a great chip and great battery efficiency that fires nearly instantly. The UFORCE T2 tank and included coils pair perfectly with the Drag 2, and offer a premium flavor experience right out of the box.
Final Verdict — Voopoo Drag 2 Kit Review
How does the successor to the legendary Drag score? By fixing the tiny flaws that were present in the original such as paint quality and ergonomics, the Drag 2 is definitely more desirable than its predecessor. Plus you get improved battery efficiency, a higher wattage output range, and the FIT mode (which may or may not be for you. Test it for yourself and decide).
The UFORCE T2 tank that comes with the kit also looks great on the mod and produces respectable flavor and clouds. It also doesn’t leak at all, which is hard to come by in a bottom airflow tank.
If you’re in the market for a new dual battery mod, the Drag 2 kit is definitely worth checking out. You get a timeless mod along with a tank that supports a wide range of coils. You’ll be getting a lot of vaping time out of this kit, that’s for sure. Stay Versed!
This device was sent to use by VaporFi for review. This does not in any way affect our opinions or ratings of the device.






I have a correction and addition information for you.
First you said that the display brightness can not be changed. Not true. When you get your Drag 2 download the app from the Voopoo site and you will be able to do a number of things. First you can enter the validation number on the box and it will verify it is not a fake. It will fill in the serial number information.
It will also allow you to adjust the screen brightness up and down on a slider for both standby and in use times.
Also you can add in a couple more types of metal to use in temp control mode. It connected to my computer via USB port and can also be used to charge the batteries that show up individually. Of course I use a battery charger but in a pinch it is a way to charge your device to use it.
I have always just used wattage mode as TC never worked well for me. The FIT is actually a mode I leave it in most.
I don’t go to the highest level because I like cool vapor and the I always use less wattage than a coil is recommended at it’s best. I don’t get what is wrong with me or the rest of the world because the high wattage settings are scorching hot and your mouth is easily burned painfully. I got a Horizon Flalcon tank in resin. This is definitely the way to go if you want your tank to stay cool. I find I am using the Horizon and the Uforce 2 and my Big Baby Beast all atop 3 different mods.
I have a Valarian a Crown 3 and a Prince tank which all come pretty highly rated but to work well need the power cranked and then I feel like I am burning my mouth and throat out if I try to use them with enough wattage for them to produce decent vapor. The Prince coils in particular are pretty huge. I wish I could use them but they just have not worked. I have a Nunchaku and a Crown 1 which don’t have those issues but mostly I use the 5 Big Baby Beast tanks I have and I use only mesh coils in anything these days.
The quality and the durability of Smok products have always been very poor IMO. The fire button wore out in the mag after about 5 months and the Procolor had a meltdown I believe from accidental continuous pressing of the fire button but it is supposed to safeguard against that. But those are the tanks that have inexpensive mesh coils and are inexpensive to buy at $13 each.
The Uforce 2 tank looks very attractive and I absolutely love the way the top slides to fill it up. So far it is my hands down favorite tank fill I have used. I can use the single mesh coils and they work fine at the temps I am comfortable with and can easily go up in power quickly if in FIT mode. I sometimes try the middle mode and it is uncomfortable for me but just shy of feeling I just got a 3rd degree burn which is saved in the highest mode 3. The single mesh coils are the best and longest lasting for me. The 3 mesh coils work fine but because they have 3 small openings left instead of one big one I found that particularly when using sweet and perhaps lesser quality juice that they gum up and I notice the draw pressure needed getting higher. I took a look at the coil and it was completely covered in black tar with extra sitting on top of the coils. Serious buildup from about 30ml of juice. Now that I am using high quality juice and the M1 mesh coils I expect them to last quite a long time which is always nice. I should mention that when I used the normal type of wire coil included with the kit and had prepped and primed that coils and it was saturated with juice that lasted only a day before just popping like a light bulb burning out so I don’t know if I got a dud or if there is an issue with those. It doesn’t bother me because I am only using the mesh these days.
So a couple of corrections but I do think that I got what I was looking for though my old mods are still useful in service.
There are also come settings that appear complex to someone that has not encountered them before such as myself and those are the coefficient settings. There are additional power curve settings as well and at least I understand those. The rep at Voopoo had no idea what the coefficient settings did and I suggested he read the manual and ask someone with more knowledge. The answer I got back was that they were used for people that wanted to use different types of wire. So with that poor answer I am still not quite sure what those do and the benefit they are supposed to contain.
I do think I got a good price on mine. I got it just before Black Friday and never saw them less expensive so think it was a decent purchase and think the most significant improvement I notice every day is the chip.
Hi there Tom,
Thanks for the detailed reply! Appreciate the correction on the brightness, we’ll have this fixed.
Everyone is different, but temperature control is wonderful if you have the correct setup. However, it does take a bit of testing to find your ideal material, resistance, temperature, etc..
We didn’t notice any real advantage over using FIT mode rather than wattage, as we found that turning the wattage up or down would achieve the same effect. However, if you’re enjoying using the FIT modes, then that’s great to hear! They do make it easier by providing three slightly different power levels, and I can see how this would make it more convenient.
Mesh coils are awesome, and the coil lineup for the Drag 2 makes it really versatile. Using juice with less sweetener is definitely the way to go to extend your coil life, so you should get a long while out of them for sure.
The coefficient settings would be for using temperature control mode with types of wire than aren’t your standard SS316L, NI200, or Titanium. If using different grade of SS wire, you would need to enter in a different TCR rating. This is because different wires heat up at different rates. This TCR settings allows the mod to regulate power correctly to the coil, and keep it at the correct temperature that you would set on the mod.
Glad you’re enjoying the mod, Stay Versed!
Just a quick correction, there is no tar buildup on your coils. Ejuice doesn’t contain tar or anything that can be converted to tar via heat. It’s likely due to the sweetener in the juice you use being heated but not tar. Just thought that was an important distinction to make.
Purchased the VooPoo Drag2 a week ago. Whlie I’m happy with the device itself, I continue to get burnt hits, even right off the bat and following all recommended tips (pre-soaking, waiting 30 minutes before vaping, waiting at least 30 seconds between hits, not taking hits longer than 2.5 seconds, starting off at lower wattage, dry sucking prior to hit, using in recommended wattage range, and even tried poking holes in cotton).
The reason I keep going back to smoking cigarettes is because of such frequent BURNT HITS and having coils lasting only a day. I’ve purchased around the 7 devices over the years, and have tried various liquids and coils. I find it very difficult to find info on how to purchase coils that avoid this burnt hit problem.
Can anyone please point me in the right direction? I’m so tired of having to replace a coil every day, along with wasting the liquid I must toss out along with the ruined coil. I really liked the vaping experience from the .4ohm 40-80w coil that came with the device, though by the 2nd day I was getting burnt hits. When I installed the replacement coil (.2ohm 65-100w) I got a burnt hit right off the bat.
I watch vapors on video reviews taking extra long and repeated hits, which I find crazy because if I don’t wait at least 20 seconds it’s a definite burnt hit. What am I doing wrong? I’m using the recommended wattage settings, and following other protocol mentioned above. I’m not sure what coils to purchase. Also, does anyone know if all of the VooPoo coils use stainless steel? The info is quite limited on manufacturer websites. Thanks.
Hi Derek,
It looks like you’re doing everything correctly as far as preparing the coil before vaping so it’s odd that you would still get dry hits. Those are all the right steps for sure.
The only thing I could suggest is to use a higher VG eliquid with your coils and see if that helps. I’ve ran a couple of different ejuices with varying pg/vg blends through the different Drag 2 coils and, like you mentioned, I’m taking long and repeated draws without any problems whatsoever. Sucks that you’re having issues with the coils and going back to smoking. I would be very frustrated as well.
Honestly I had the same issues with a couple types of tanks, personally the freemax mesh pro tank using freemax quad mesh coils works best for me. I run it at about 90w and they last two weeks. I also never have to poke the cotton as they already run ports between the coils. I’m not a light vaper either, just to preface that now, I chain vape and drive 5 hour round trip to work.
The big difference here is that the OP is NOT using a commercially made coil and says he cant get them in Brazil. He says he uses a RDA though sounds like a RTA. Either way that makes a world of difference and is likely not wicking his RDA properly and is even prepping it like a pre-made coil head. I have not had a bunt coil in years but I prep them and break them in.
With my normal coil RTA I have no issues. With my two mesh RTAs they are hard as heck to wick. I am not even bothering them. Even in Rip Trippers video of how to wick the Unity mesh RTA he says he tried wicking it 50 times before figuring out a way that works for him.
I think the OP is not wicking his RTA properly and compounding it by misunderstanding how to use the functions on any mod like temp control.
His issues really have nothing to do with the Drag 2 mod tank or coils.
His questions should be addressed in a RDA section.
He did not mention he was Using a RDA until I asked him which led us to assume an incorrect issue.
I’m a bit lost, why would you need to adjust the wattage on tc mode? if you can just adjust the temperature.
Just started on tc, on a voopoo drag 2
Hey Fabricio,
Wattage lets you control how fast it will get up to temperature as well as how hard of a hit it’s going to be. Think of temperature control of just limiting how hot it will get rather than how much power is going to the coil. Hope this helps!
That explains a lot, thank you!
Adam hit the nail on the head. Temperature Control just limits the hottest the coil can get as a limiter. You still need to adjust the wattage. I didnt catch what coil you are using but make sure the metal in the coil matches the setting in temp control.
If set properly a much longer hit than 2.5 seconds should be no issue.
BTW I like mesh coils and any Freemax Fireluke coil will work in any Uforce tank
I like the Uforce T1 tank with 8ml capacity much better with the fireluke coils.
Im using a Gear Rda, and a 2*28+32 SS316l
I live in brazil, and we dont have those coils around.
You guys helped alot, the question was kinda noob, but it didnt made any sense to me at all!
Thank you!
OK that changes everything. You are priming a RDA coil with the steps that sound like a prebuilt coil head like I am talking about.
So if it were me forget about the temp control. It doesnt work as you thought and needlessly complicates things.
I also didnt look up your atomizer but it sounds like it has a tank? If so it is an RTA and I very much suspect whatever you have if not fixed by just using wattage the cause is your wicking. I have a few RTAs and two of the highest rated new mesh RTAs are truly very difficult to wick and act exactly like that.
Check out a video by someone like Rip Tripper on YouTube or someone you like that shows the issues with wicking that RDA or RTA and use some good wick. You may try the newest version of Bacon or Vandy Vapes wick. Many things can make it difficult to get what look like blazing hits including lighting for the video to temp and humidity etc. But you should get a satisfying hit if your coil is made properly and no hot spots as you check before wicking. And a high VG juice of known good quality is often used for what you want.
So just try the wattage. I get decent hits and rarely go above 40 watts regardless of what is marked on the coil. I have a dozen mods that can do 200 watts or more but even when using a RTA I like cool vapor and big flavor and dont like burning my mouth off to see a bigger puff of vapor.
So make sure your coils are good and the mod shows close to the same ohms you measured making the coil. Try the wattage and if no go my money is on wicking not getting juice to that coil. It should be super absorbent and not choked so it gets dry.
I was surprised to read a review about how great the paint was.
It has the worst paint of any mod I have ever had. I have been easy on it but most of the paint was off in months. I have mods years old that still have perfect paint.
I wish I would have waited and got a second Aegis Legend Limited Edition for $50/kit. Looks and works great and is but to handle being dropped and submerged in water. The drag is OK but nothing special and overpriced.
Does anyone know how to fix the message “check atomizer” after changing the coil? I have tried several different coils, the one that came with the kit and authentic coils I purchased separately. I’ve also made sure all contacts are clean, etc. that I’ve read online but still no luck.
Have you tried a different tank to see if it reads it?
Usually that means that the 510 connection is not working. Sometimes the pin in the bottom is either worn or out of adjustment so it does not make contact with the pin in the mod.
If another tank works then look at the pin in the Voopoo tank and the spring loaded mod connector. I clean that with a Qtip and push down to see if it moves.
Once you figure out what is wrong and if needed have the mod replaced if defective know that if you like any Freemax Fiteluke coil will work in any Uforce tank. Personally I use the Fireluke mesh coils in mine.
I also prefer the Uforce T1 over the T2 it comes with.
Both for the looks and the 8ml juice capacity.
When trying to figure out the issue with the check atomizer which means it doesnt sense one installed.
You can just put a coil in the base and no need to fill a tank until you get it working..just dont fire it of course.
I would look to the pin on the bottom of the tank to ensure it is both contacting the coil and extending past the threads so it makes contact with the pin inside the mod.
It well may be defective.
The only other possible thing you might try is plugging the mod in and updating the firmware. That also allows you to adjust the screen to be brighter and add other types of metal in to your temp control menu.
My guess it is physical/mechanical but it is free and worth a try.
In reply to Amy Beth and confirming what Thomas said, I replaced the glass with an 8ml one and immediately after could only achieve “Check Atomizer” on both heads. After the ensuing mess of emptying the tanks I narrowed things down to the 510 pin at the bottom of the tank not making contact with the 510 pin in the mod. Neither pin is spring loaded which I class as the only fault with both units.
I trimmed the end of a toothpick to give it a larger cross-section and without undue force I gave the pin in the bottom of the tank a prod with the toothpick from the inside and it dropped into my hand.
It is definitely a weakness of the tank and one I see as a recurring issue in the days to come but it shouldn’t be anything a slightest and very carefully applied dab of superglue won’t cure.
The 510 pin of any tank should extend beyond the screw-thread that screws into the mod by just a millimetre or so and it might be an idea that after changing heads, just to push this pin back in to meet the bottom of the new head prior to screwing the tank back into the mod.
Yes the 510 pin is the most common cause so a good guess.
Remember the OP is not using the stock Uforce T2 but instead a RDA or RTA. So we dont really know what the pin is like.
Yes the pin should extend past the threads surrounding it on the bottom. Some 510 pins screw in and with a small screwdriver can be adjusted.
If his pin is too short and cant be adjusted it would be easy to replace cheaply. That is if being in Brazil doesnt limit him as he mentioned.
In fact I have noticed on a few of my own tanks the pin just barely extends enough to work and will be replacing them.
How do I turn up brightness on my screen on a drag 2 . And I am using a Mac and can’t find how to download a Mac version
Are the batteries removable in this? I got mine a while back from a friend and I really love it, but I’ve had to use the USB since I got it and can’t seem to get the plate off to charge the batteries. Please advise
Of course you can. The side of the mod that says DRAG is magnetic and just pulls off if you use a finger nail.
A manual might be worth downloading.
I’m new to the machine and I want to know if it can be used with only one battery before I buy jt
NO two !8650s.
Read the manual and connect it via USB to their site and you can add more features like you asked about. It is hardly a special kit. I got a GeekVape Legend Limited edition at the same time and the drag has almost no paint on it and the other still like new and you can drop that or submerge in water and it still looks new.
BTW I use the T1 tank with Fireluke mesh coils and the included adapted so it is 8ml and vastly better than the T2.
If you must dont pay more than $25 for the kit and better yet get a newer device as the fire better and are much more efficient. I just bought a new Gpriv 2 mod for $15 and a morph full kit for $25.
So I suggest you
…get something newer the armor and electronics are better. And cheap good batts are Molicel batts built like a tank good for 500 recharges. 35amp contiuous and 2500mAh and $4/ea online 18650 battery store. The are coming out with 3000mAh version this summer.
If you get a newer mod that uses 21700 or such batts you will get more power and capacity. But I have 10 mods that use 18650s so I bought 14 to toss my
Sony VTC5A batts that dainty.
Mod works well. But the paint on the side that says “DRAG” peels completely off after about 6 weeks. And that’s with me using inside only and never dropping once. Like I said it still performs well but the ugly peeling paint is a deal breaker for this mod. The performance isn’t good enough to dismiss the ugly paint peeling and basically wiping right off.
Hey Guys , What is everyones favourite settings for big clouds ?
I find difficult to find the sweet spot in which you get a good cloud =, among so many features specially being new to vaping .
I also keep getting spit backs , but that I think is my type of juice so will try different ones .
The only thing I don’t understand is why isn’t it an inconvenience that it at least doesn’t come with one battery set to start out with? I have never bought a vape without it coming with an internally installed battery or without batteries in general. I was so pissed to pay $300 for all of my products in bulk just to find out this didn’t come with batteries. (Me and my fiancé both vape and wanted something better which is why my total was so much for bulk)