
Vandy Vape have once again collaborated with Alex from VapersMD to deliver a new iteration of their Berserker MTL tank — the B3 MTL RTA. Although Vandy Vape has dropped the “BSKR” from the name, this is still very obviously the Berserker V3. Like the BSKR V2, the B3 has a unique airflow setup that has been specially tailored for MTL vapers.
The B3 is a single coil RTA with a 24mm base diameter and a small dual post build deck. It comes with four airflow inserts that also double as the 510 pin and these can be switched out to achieve a wide range of MTL draws. The B3 also comes with three MTL drip tips, as well as 4 tank sections for eliquid capacities of 2ml or 6ml.
Is the B3 an RTA you should consider for MTL vaping?
Box Contents
- 1 x B3 MTL RDA
- 3 x 510 Drip Tips
- 2 x PEI Tubes (6ml/2ml)
- 2 x Glass Tubes (6ml/2ml)
- 2 x 0.74Ω Fused Clapton Coils
- 4 x Airflow Inserts
- 1 x Accessory Bag
- 1 x User Manual
Specifications
- 24mm Base Diameter
- Dual Post, Dual Terminal Build Deck
- Range of MTL Draws
- Uses Airflow Inserts
- Single Coil RTA
- 2ml/6ml Capacity
Design & Build Quality


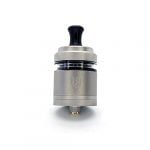
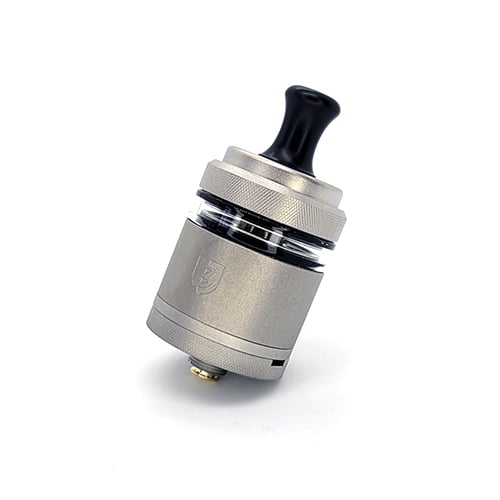
The B3 MTL RTA is a good looking, small tank. It has a 24mm base diameter, the same width as the BSKR V2 MTL RTA, so it looks good on top of most mods and will sit without overhang.
There are 5 colors available: matte black, stainless steel, gun metal, frosted grey, and gold. I’m using the frosted grey color for this review and it’s a matte finish dark silver. The tank is attractive overall and the design is simple but refined. The top cap and base of the tank each have knurling which adds grip and adds to the design. There’s a “B” in a shield for the Berserker logo that is imprinted on the front of the tank but otherwise the tank is smooth and looks clean.
You get a lot of goodies with this tank. Included in the box are a total of three drip tips, four tank sections, and four airflow inserts. The drip tips vary in height but they are all the same bore. Two of the three are all black, while the tallest one features metal rings at the base. These rings are the same color as the tank so they match well together. These drip tips are a 510 size so they can be switched out for any other 510 drip tip that has o-rings on it.
The inclusion of 4 tank sections is also neat. You get two made of glass and two made of PEI (a heat resistant plastic). The B3 comes out of the box with the glass 2ml tank section installed but you can easily switch it to one of the 6ml sections. To do this you have to unscrew the glass from the mid cap underneath it.
Once it’s unscrewed the glass just pops off (it might take some force to remove it the first time but it becomes easier if you lube the rings with a touch of ejuice). To install the 6ml tank section you have to install the chimney extension which just screws on to the existing short chimney in the center of the tank. Pop on the new glass and screw it back together and you now have a 6ml capacity MTL RTA.
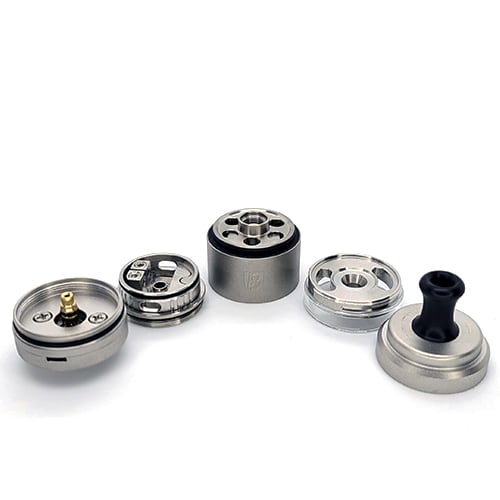
One thing that I really like about this tank is that it can be completely disassembled. Including the drip tip and airflow pin, the B3 disassembles into 11 pieces. This allows you to completely clean it out if you so wish.
The top cap comes off with a quarter turn and gives you access to two large kidney shaped fill ports. If you then remove this fill port section, you’ll have access to the tank section where you fill your ejuice. Here there are 6 circular holes in the floor of this section that lead down and over a domed section that sits over the build deck. Ejuice travels down the outside of this dome and down to the wicking ports on the build deck.
Building on the B3 MTL RTA


The build deck on the B3 MTL RTA is very similar to the BSKR V2 MTL RTA. It’s a two post, two terminal build deck with top secured grub screws. A single small coil can fit nicely on the deck and Vandy Vape include two 2.5mm ID, 0.74Ω superfine fused clapton coils. These coils are the perfect size for this deck and fit perfectly when the legs are trimmed to 5mm.
Once your coil is installed, wicking is similarly a breeze. There’s no cotton included in the box so you’ll have to use your own. You want the cotton to be snug but not so tight that it deforms your coil as you pull it through. You will want to cut the cotton so that the ends go down into the wicking channels on either side of the build deck and then slightly out and through the wicking holes on the side of the deck.
You need to ensure that you have enough cotton that it sufficiently fills the wicking holes. If not, you’ll have flooding of the deck. I managed to get the wicking right on my first try so it is not too difficult. Just use enough cotton and make sure those holes are filled nicely.
Airflow


The airflow setup on the B3 is once again unique but this time it’s a bit different than previous Berserker tanks. The airflow inserts for the B3 also double as the 510 pin. They get inserted into the bottom of the tank and the insert then comes out and protrudes out of the bottom of the build deck, directly underneath your coil.
Four airflow inserts come in the box: 0.8mm, 1.2mm, 1.4mm, and 2.0mm. This is a nice range of MTL draws; a very tight MTL draw with the 0.8mm insert, a tight MTL draw with the 1.2mm insert, a medium MTL draw with the 1.4mm insert, and a loose MTL draw with the 2.0mm insert.
To change the insert simply pull out the airflow insert from the bottom and push in a new one.
I like this airflow pin setup more than the airflow insert setups from previous Berserker tanks. It’s easy enough to do and the airflow insert stays in there securely. However, I also have the same complaint as I did with other Berserker tanks and that is that it’s not practical to carry around the pins and adjust the airflow when you’re out and about.
If you want to change the airflow when you’re out then you’ll have to carry around the insert pins with you and this is a sure-fire way to lose them. It just isn’t practical to change the inserts on the go. However, once you find the airflow insert that you like I don’t think that you will want to change it. More about this and my personal experiences with this tank in the performance section below.
Performance
I installed the included superfine fused clapton coil that comes in the box and it came out to 0.73Ω, pretty close to the 0.74Ω listed on the bag. Since this is a MTL tank meant to be used at low wattages, I used a 30mg nicotine salt ejuice and vaped around the 18W mark. I tested all of the airflow inserts to see which one I liked best.
Firstly, I have to say that this tank vapes like a dream. It’s like vaping a much more flavorful pod vape. Even though I was vaping at low wattages, the flavor is excellent. The airflow is also smooth and quiet no matter the airflow insert that I used.
The 0.8mm insert was way too tight for me and I did not enjoy vaping on it very much. But if you like a really tight MTL vape then this insert will suit you perfectly. The 1.2mm insert is still tight but more similar to the tight MTL draws that I’m used to. Still, a little too tight for my liking.
The 1.4mm is right up my alley and my favorite of the four inserts. Once I used this insert, I didn’t want to switch it out. I actually ended up going back to this insert after trying to 2.0mm insert and I’ve been using the 1.4mm ever since.
The 2.0mm insert is a loose MTL draw that I found just a touch too airy. It’s still a nice MTL, just on the looser side.
All three drip tips are a pleasure to use but I settled on the medium height drip tip in the end. As for the glass, I like the look of the 2ml glass better and this tank doesn’t use a whole lot of ejuice very fast so it never inconvenienced me.
Verdict
The B3 MTL RTA is another great tank from Vandy Vape and Alex from VapersMD. The tank has a much more attractive design than the previous BSKR V2 and I think that it even performs better. The airflow inserts provide a wide range of MTL draws that range from a very tight MTL to a loose MTL draw and if you’re a MTL vaper, I believe that you will really like the draw with at least one of the four inserts.
The B3 is also quiet no matter which airflow insert you use and the draws are smooth. While the airflow inserts aren’t practical to carry around to switch out when out of the house, once you find one that you like I don’t think you’ll want to change it.
The build deck is small but it’s easy to build on. I also like that you can disassemble the entire tank for easy cleaning. There are a lot of pros to this tank and really not that many cons.
As far as MTL tanks go, the B3 is one of the best out there right now. I can easily recommend checking it out if you’re a MTL vaper.


This review was just PERFECT. I felt that it covered all the bases (+ more!) Thank you very much for this perfectly eloquent review! I wonder if any leaking ever occurs from the outside 510 insert pin? Surely, it doesn’t. I’m pretty certain that this will be my next RTA… unless a new BP MODs Pioneer RTA or alike comes out!
I have this tank and i changed the pins without unscrewing the 2 philips screws, am i doing it wrong? I read the instructions and they say to just pull the pins out…
In fact, I was doing it wrong! For some reason they were not coming out easily for me until I undid the tank. After your comment though I went back and tried with more force and it does indeed pop out without needing to take out the 2 screws. I’ve updated the review and I appreciate the comment!
Thank you, very helpful. Just assembled my first RTA thanks to your review.
Stellar results and some fun fiddling around.