
Depending on where you are located, obtaining a tasty and flavorful Ejuice might start to become a little difficult. So, you are going to have to switch back to the stinkies, right?
Hell no!
There’s an alternative that will save you money and give you the best E-juice that is just perfect. How? Because today you are going to learn how to make your own vape juice. It’s actually pretty simple.
If you’ve ever cooked anything, then you’ll have the skills required to make vape juice. There’s a little bit of a learning curve, it’s true. But once you master it, you’ll be all set for good. This guide is going to show you how.
What is DIY Ejuice?
DIY Ejuice is literally a homemade version of the stuff that you normally buy in stores. The only difference is that you aren’t paying a premium for a fancy package, a designer label, and a slick marketing campaign.
Here’s what commercially available vape juice contains:
That’s literally it.
Now, here’s what homemade e-juice contains…
- Vegetable Glycerin
- Propylene Glycol
- A small amount of flavoring
- Nicotine (optional)
Notice anything?
Yup, it is all exactly the same. Provided you buy your ingredients from a reputable and trustworthy source, you can make something that is just as good… No, scratch that… Better than anything you’ll buy in a store.
What Are the Advantages to Making Your Own Vape Juice?
Still not quite sure? We understand your apprehension. But, believe us, provided you follow some common-sense guidelines, there is nothing to worry about. Here are some great reasons to consider making your own DIY Ejuice: –
1) It’s significantly cheaper. Depending on your vaping preferences, you might have noticed that Ejuice is getting pretty pricey. Those fancy labels don’t come for free. For an initial outlay, you’ll be able to create literal gallons of ejuice for the same price as one bottle of premium vape liquid.
2) You are in control. Ever struggled to get a high VG juice to wick on your new tank? Like the flavor, but just wish there was less throat hit? Wish there was a little menthol hit following your melon? The answer is to make your own. You can tweak and refine your recipes to make a 100% customized vape to suit your own taste.
3) Unlimited options. Once you get good, you’ll be like a mad scientist, mixing and blending. Warning: It can become a little bit of an obsession as you search for the ‘holy grail’. If you can imagine it, then you can make it. It’s that simple.
4) It saves time. We aren’t saying DIY Ejuice is the quickest process. But let us ask you this. How long does it take to head down to the vape store and back? If the answer is any longer than 20 minutes, you’ll definitely be saving time by making your own.
5) You are ‘future proofed’. Certain states are bringing in mandates that will limit or even completely prohibit the sale of flavored ejuices. (yeah, it sucks). If you can make your own, you can ensure that you’ve got a healthy supply for years to come.
All makes sense, right? Ok, here’s how to make your own ejuice. Excited? We are…
How to Make Vape Juice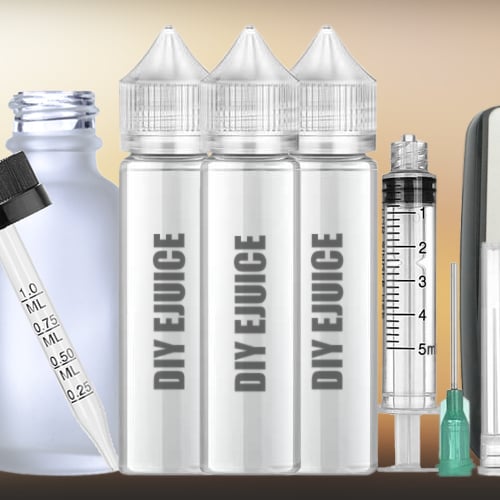
We are going to be upfront and honest. You will need to be prepared, and it does take a little time to get it exactly right. It can all be a little daunting.
However, don’t fret. We’ve assembled this guide that’s going to tell you everything you need to know.
We will show you what you need, why you need it, and how to use it. We’ve included a few of our favorite recipes and some great resources too!
Equipment Needed for DIY Vape Juice
Ok, consider this an equipment shopping list to make your own Ejuice. We’ll explain what each item is for as we go.
- Empty Bottles
We’ve all seen that guy walking around carrying a huge pitcher of ejuice that he dips into occasionally, right?
No, of course, we haven’t.
If you are going to make your own DIY ejuice, you will need a lot of bottles to store it. It also makes mixing small batches much easier.
The best bet is to go for a selection of bottles. We recommend 10 x 100ml unicorn bottles and blunt tip needle caps as well.
- Blunt Tip Syringes
If you’ve ever spilled store-bought Ejuice, you’ll know that it is sticky stuff that drips and gets everywhere!
It isn’t the easiest substance to pour. The answer is to use wide gauge (blunt) syringes to portion and allocate your various ingredients.
Go for a range of syringe sizes. Don’t cheap out and pick the smallest. Portioning out 500ml of propylene glycol with a 10ml syringe gets a little tedious, trust us.
- A Measuring Flask
The key to making a great DIY Ejuice is to be precise.
As the saying goes…
“If you ain’t measurin’, you’re guessin'”!
You will need to measure how much of each constituent part you are pouring for both large and small amounts. The easy way to do this is with a measuring flask.
- A Weighing Scale
This is a more precise way to measure out your ingredients for your ejuice. Provided you pick a good scale, you can measure the ingredients by weight instead of volume. This is much quicker and works really well if you mix larger batches of your own vape liquid.
- A Funnel
The necks of those unicorn bottles can be seriously narrow.
Ever tried to pour VG from a big bottle into a little one? How did it turn out? The answer is a funnel.
- Rubber Gloves
Now, it isn’t all fun and games. There is an element of safety involved.
We want you to pay attention.
High-strength nicotine is dangerous in large quantities.
Nicotine can be absorbed through your skin. In high concentrations it can make you feel seriously sick. We will go through some important safety points below, but for now, let’s just say this.
When mixing DIY ejuice with nicotine, you must wear rubber gloves.
- Safety Glasses
This is optional, but we think it’s prudent. Even if you aren’t using nicotine, a little menthol is a gift that keeps on giving, especially when it comes to eyes.
A pair of safety glasses are cheap, and during the early stages, you will have spillages and splashes.
- Labels
Imagine making the most amazing DIY juice recipe only to forget what was in it?
Trust us, making your own DIY vape liquid is seriously addictive, and you’ll end up with a ‘vape shelf’ that looks like a laboratory. It’s easy to lose track.
The answer is to invest in a cheap set of stick-on labels so you can annotate each bottle, with things like the flavors used, the VG/PG split… And not forgetting the nicotine concentration, of course!
Ingredients Needed for DIY E-juice
Ok, here’s the good news. You won’t need too many ingredients to get started. We won’t go into specifics here about individual flavors, but a rundown of what you will generally need to make DIY ejuice:
- Vegetable Glycerin (VG)
Vegetable glycerin is a liquid that is quite thick and tends to pour slowly. VG tends to make thicker clouds but offers less throat hit.
You’ll find cloud chasers on big devices love a VG heavy ejuice.
Depending on your style of vaping and your own personal taste preferences, it can be mixed in different amounts. Be sure to order a big bottle of this.
- Propylene Glycol (PG)
Propylene glycol is used in DIY Ejuice recipes, but not quite as much (we’ll tell you why in a minute).
It produces less vapor and is thinner than VG. It is used to provide the ‘throat hit’ of DIY Ejuice. It is also handy to get an Eliquid to flow and wick more easily.
You’ll find PG-based juices are used mostly in smaller devices.
- Nicotine
This may be dependent on where you live. Some states offer huge bottles of concentrated nicotine (up to 80% strength), whereas other states have restrictions with regards to their quantity or strength.
If you can, get a decent-sized bottle of high-strength nicotine. Or alternatively, many vape stores offer small nicotine ‘shots’ that can be added to a bottle of ‘virgin’ ejuice.
- Flavors for DIY Ejuice Recipes
Now, this is where it all gets a little variable, but that’s the beauty of making DIY ejuice.
The possibilities are endless. We couldn’t even begin to list all of the flavors that you might want.
Flavorings are added to give your ejuice its signature taste. The bottles might look small, but that’s a good thing. They are super concentrated, and it normally only takes a small drop or two to make an entire bottle taste a certain way.
You’ll tend to find that both the nicotine and the flavoring come suspended in PG, so you’ll need more VG than PG when making DIY vape juice. As you’ll see when we explain how to mix ejuice, this must be taken into account when working out the ratios of your final recipe.
Use a Calculator
Here’s a top tip when mixing your own ejuice. When mixing, you will be dealing with volumes, weights, ratios, percentages, and sometimes percentages of percentages.
Sounds tricky, right?
If (like us) you aren’t a math genius, your best bet is to use a calculator to work out the correct proportions to use in your juice.
The good news is, it is really easy.
Essentially you just plug your ingredients in at one end and out pops the quantities to mix at the other end.
Here is a list of some great DIY E-juice calculators: –
- Steam Engine
- Make my Vape (this one is great)
- Vape Tool
- LiqCalc
There are lots of great vaping apps out there! We’ve reviewed some of the above and more right here.
Important DIY Juice Tips
Ok, before we get mixing, there are a few things that it is important to know. We want you to fall in love with mixing your own vape juices and want you to be successful the first time. Use the benefit of our experience, here are some great tips: –
Observe proper safety precautions
We’ve put this first for a reason. While making your own DIY ejuice is safe, it needs a little care. Keep nicotine locked away when not in use. Only open the bottle when you are going to use it, and always wear gloves.
Oh, and before we forget… make sure you are working in a well-ventilated room. Breath a waft of concentrated nicotine and you are going to have to go for a lie-down, as the room will be spinning.
Be organized
Like with any project, the key to making excellent and repeatable results is to be organized. Clear an area (and one out of reach of both kids and animals). Get all of your gear organized and on hand. It will make life much easier, especially when the glycol starts flowing.
Be precise
This isn’t a ‘hit and hope’ kind of deal. Do you think Gordon Ramsey just throws things in the pan and hopes for the best?
Nope, he follows a recipe.
And you must do too, to the letter. This is especially important when you are mixing high concentrations of nicotine.
Make small batches or individual bottles
When you are starting out, it is easy to get things wrong. Like we said, there is math involved.
If you make a mistake with a small bottle of juice, then you’ve lost very little.
Make a mess of a 1-gallon batch, and you are going to be sat on the porch, with no ejuice, waiting for vape mail. (if it is allowed)
And again, from a safety point of view, the chance of making yourself sick with a small amount of nicotine is minimal. Get a decimal point in the wrong place with a huge quantity of nicotine and it is going to be a bad time.
Don’t mix manufacturers
All flavors are not created equal. One manufacturer’s ‘ripe strawberry’ is another manufacturer’s ‘standard’. When looking at recipes, be sure to choose the flavors by the correct manufacturer.
Follow the recipe
You might want your vape juice a little sweeter or with a really strong taste.
Patience, our young Padawan! All in good time…
When you are just getting started, it really is best to follow the recipe and don’t deviate from the script. Once you’ve got a good result, you can work on refining it to your taste.
Less is more
Don’t feel that you need to go overboard on the flavors. A little adds up to a lot, and you’ll be amazed by how much 0.3ml difference can make to the taste of your juice. More flavoring added doesn’t add up to a better ejuice.
Keep a cloth handy
Spillages and drips are going to happen, so it pays to be prepared. We usually have a roll of paper towel and a damp cloth ready and waiting for the inevitable.
Don’t be afraid to make the odd mistake
Listen, it isn’t always going to work out as you want it. Try and see it as part of the fun. We’ve all been there, and mistakes are what help us to learn. Don’t get disheartened. Work out where you went wrong and try again. Your ejuice will thank you for it.
DIY Ejuice Guide | A Step by Step Walkthrough
Ok, here we go. Here’s a quick and easy guide to making your own ejuice.
Step 1) Check your recipe and assemble your workstation.
The first thing to do is get all set up. Try and find a large, clean counter. Check the recipe and take out only the ingredients you need. Make one recipe at a time, or it tends to get a bit confusing.
From there, get your syringes, bottles, and other tools ready and on hand.
Step 2) Plug your recipe into a calculator
Enter your recipe and quantities into your choice of calculator. Most recipes won’t give defined volumes but instead will give a percentage. This is great as it allows you to make variable quantities of each vape liquid.
Step 3) Measure out your nicotine first
Once your calculator spits out the numbers, it’s time to get pouring. Here’s a top tip. Put your nicotine into your bottles first.
Why?
Mixing your own vape liquid is really therapeutic. It is also a little bit repetitive (especially if you are mixing 10 bottles of the same juice). It’s very easy to ‘drift off’ and daydream. The last thing you want to do is add your nicotine twice.
By doing it at the start, you can easily see which bottles have been ‘nicotined up’ and which haven’t.
You can either measure by volume using a syringe or pipette, or you can weigh the ingredients. Weighing is much more accurate.
Step 4) Add your flavor
The next step is adding your flavor. We do this next at an early stage to avoid ‘double adding’. Also, there is nothing more infuriating than adding an expertly calculated quantity of VG only to find you’ve made an error and are now left with no room for the flavor.
Step 5) Top up the bottle with the VG and PG
This depends on your ratios. But according to your requirements, add the desired calculated quantities of VG and PG. We recommend adding PG first. It’s better to have a juice that is too thin than one that is too thick.
You’ll often find with strong, heavily flavored juices, you won’t need to add PG at all as the required quantity has already been made up by the nicotine and flavors.
Step 6) Shake and mix well
Now there are various ways you can do this. Go manual by hand and give each bottle a vigorous shake (and by vigorous, we mean at least a minute a bottle).
If this sounds like hard work, here’s a great tip you won’t see elsewhere…
Put your bottles in a couple of large socks, wrap the full sock in a towel, and put it in the dryer on a spin cycle for a minute. You can mix 10 bottles at once!
Step 7) Label
Once your juices are mixed, the time to label them while it is still fresh in your mind.
Here’s what we write on our labels: –
- The name of the juice
- The date it was mixed
- The VG/PG split
- The nicotine concentration
Step 8) Store and steep?
This bit is optional.
Ever had spicy food that tastes so much better after a night in the refrigerator? The same principle applies to your juice. Those flavors all interact and mingle.
Some ejuice recipes call for a steeping time. Others don’t. We normally crack open a bottle straight away (we’re impatient). At the same time, other juices are placed in a dark, warm place to develop flavor.
Step 9) Enjoy
How much did your entire DIY ejuice setup cost? $30? $50 max? Look at how much those 10 bottles would have cost you in a store.
You’ve just made sweet bank while making sweet juice!
Now’s the time to enjoy it!
There’s nothing nicer than putting a few drops of your latest recipe on a dripper and blowing a real cloud.
Congratulations and welcome to the club!
E-Juice Recipes to Try | Our Top 3 Picks
Looking for a few DIY Ejuice Recipes? Here are 3 of our favorites.
God Milk
A taste of lush, fresh, and ripe strawberry combined with biscuity undertones on the exhale. This recipe is sweet with hints of cheesecake and cream.
You’ll notice the recipe also uses dragon fruit.
Remember how we said a little flavor goes a long way? This really brings out the taste of the strawberries. Try it with and without, and you’ll see the difference immediately.
One neat thing about this recipe is that the flavors are all from the same manufacturer.
- 3% TPA Bavarian Cream
- 3% TPA Cheesecake (Graham Crust)
- 1% TPA Dragon Fruit
- 4% TPA Ripe Strawberry
- 4% TPA Strawberry
Aftermath Clone
Are you ready to make an amazing DIY Ejuice? This one is awesome. The main flavor is that of glazed donuts with just a touch of blueberry. Undercutting the entire thing is a cereal note on the exhale along with a hint of ice cream.
Be aware, this recipe uses flavors from different manufacturers.
- 6% TPA Blueberry Extra
- 2% TPA Sweetener
- 1% TPA Berry Crunch Cereal
- 3.5% CAP Glazed Donut
- 3% FW Vanilla Bean Ice Cream
Lemon Tart
Now listen, we aren’t saying this is a copy of a famous recipe. But if you knew a ‘lady’ who would serve you ‘dinner,’ what would you call her? You know what we are getting at, right?
Here is a lemon tart recipe that tastes very much like something else, complete with a biscuity crust and a meringue touch. This is pretty complex and needs to steep a few days for the best flavor.
- 1.5% Inawara Biscuit
- 3% FA Biscotto Cookie
- 1% CAP Juicy Lemon
- 8% CAP Lemon Meringue Pie
- 3% FA Limone Sicilia
- 1% CAP Super Sweet
Remember how we said the only limit is your imagination? There are literally thousands of recipes. Here is a great site to browse and see all the possibilities!
How to Make Vape Juice | FAQ
Got questions? Don’t worry, it is bound to happen when you are new to something. Here are things we get asked all the time
What do the letters mean before the e-liquid flavorings?
Ah, this is a biggie.
The letters indicate the manufacturer of the various flavors.
Often the flavors have the same name but different tastes depending on who makes them. Once you join the DIY Eliquid community, you’ll often come across terms such as FA, CAP, TPA. These are all the names of flavor manufacturers used in DIY Eliquid. They mean ‘Flavor art, Capella flavors, and the perfumers apprentice’ respectively.
Is it safe to make your own vape juice?
Yes, it is. Provided you use common sense and stick to a few simple guidelines. There is no difference between the ingredients in your homemade vape juice and that of commercially available juices. So, it is as safe as store-bought juices.
It is important to note that you shouldn’t try vaping unusual fluids, such as oils and additives. This can be dangerous.
What are the ingredients in vape juice?
It’s really simple, and we went through it above. Ejuice contains, in order of volume:
- Glycol (either VG or PG)
- Flavorings
- Nicotine
That’s it!
Is it cheaper to make your own vape juice?
It is definitely cheaper to make your own Eliquid. The initial outlay for tools and flavors might seem a lot, but when you realize how much juice you can make for this amount, it is far cheaper on a price per ml basis.
Plus, you can make your juice to suit your taste.
Can I vape essential oils?
Absolutely not. Any oil in a vape device is a bad thing. Essential oils create smoke, which is bad for your lungs. Essential oils, coconut oil… in fact, any oil, should not find its way into your recipes.
Look at the above list of what goes into vape juice. If it doesn’t come under any of those headings, don’t vape it. It is that simple.
Conclusion
Making your own DIY e-liquid is a hobby within a hobby. It won’t take long for you to be ‘bitten by the bug’. Once you get the hang of it, you’ll be spending your days looking for that secret ingredient that will make your homemade vape juice into an exact (or better) copy of the store-bought stuff. Provided you observe a few safety rules and go slowly, you’ll be able to whip up an amazing juice and save money while doing it.
Got a favorite DIY vape liquid recipe you’d like to share? Let us know in the comments!


Add comment