Voopoo Drag Q
8.2
PROS
- Comfortable size
- Gradient LED bar is really cool
- Airflow/Wattage adjustment dial makes it easy to use
- Airflow/wattage dial makes satisfying clicks when adjusted
- Good for RDL and MTL vaping
- Very beginner friendly
- Battery life is good
- Good pod life
- Charges quickly
CONS
- Silicone grip on bottom of device makes it prone to toppling over
- Fire button is so flush with the body that it can be hard to press
- Pod will overflow if filled too quickly
- Coils can be difficult to push into bottom of the pod
Our Verdict
The Drag Q is meant to be a device for MTL or RDL vaping and it does well for both. However, I think that its strong-suit is MTL vaping. Very few devices can be excellent at two styles of vaping and the Drag Q is no exception. It’s decent for RDL vaping, above average even, but MTL vapers will get the best use out of this device.
The small and slim form factor makes this an easy device to carry around and the ease of use will be appealing to beginning vapers. Just turn the dial to increase or decrease the power and airflow simultaneously, and then draw on the mouthpiece or press the button to vape. It really couldn’t be much simpler.
With the performance aside, I really liked the gradient LED lighting bar. It’s a unique feature for a pod vape and it just screams “cool” to me. It’s just another reason to pick one of these up and enjoy it for yourself.
The Voopoo Drag Q is a different type of pod vape from Voopoo and in some ways it’s even different from other pod vapes on the market. The design and shape are most similar to Voopoo’s pod mods like the Drag X & Drag S, but the size, features, and functions are more in line with your average pod vape.
The Drag Q is meant to provide a mouth to lung (MTL) and restricted direct to lung (RDL) vape (Confused about MTL and RDL? Check out our guide to the difference between mouth to lung and direct lung vaping). It’s also very easy to use with not many features to adjust and this makes it a great device for new vapers.
The Drag Q has a 3.5ml capacity tank and comes with two coils: a 0.5Ω coil and a 1.2Ω coil. It has a 1250mAh battery and will fire from 8-25W. It also features an adjustable airflow dial which simultaneously adjusts the wattage when you turn it.
Box Contents
- 1 x DRAG Q Device
- 1 x ITO-X POD (3.5ml)
- 1 x ITO-M0 Coil, 0.5Ω
- 1 x ITO-M3 Coil, 1.2Ω
- 1 x Type-C Cable
- 1 x User Manual
- 1 x ITO Mesh Coil Card
Specifications
- Size: 35mm X 20mm X 120mm
- Capacity: 3.5ml/2ml(TPD/UK)
- Battery: 1250mAh
- Output Power: 8-25W
- Adjustable Wattage/Airflow Dial
- Colors: Vitality Orange, Classic Red, Carbon Fiber, Galaxy Blue, Chestnut, Marsala
Design & Build Quality
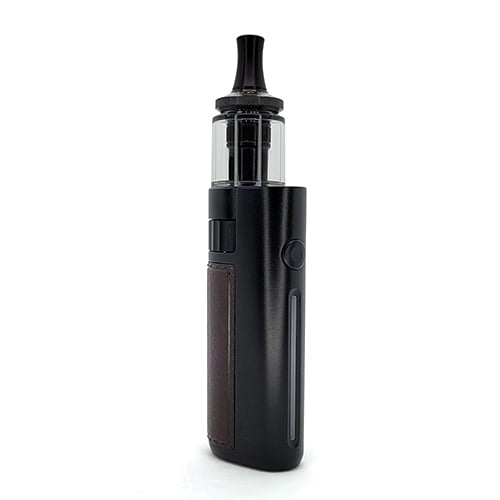
The Drag Q looks a lot like Voopoo’s Drag X & Drag S pod mods but it’s a much smaller and lighter device. It has the pod mod look with a tall body and circular tank-style pod, but it’s only 120mm tall, 35mm deep, and 20mm wide. That’s much less chunky than the Drag X and S pod mods and more similar to other large pod vapes.
I like the skinny pod mod look. Because it’s tall and deep it’s really comfortable to hold and the placement of the fire button is perfect. Whether thumb-firing or using your index finger, it’s at the perfect spot on the front of the device.
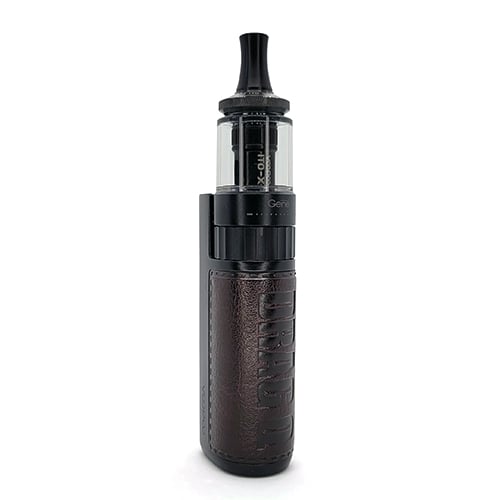
The design is also attractive and classy. My test unit has a black frame (the frame is made of zinc alloy) and a dark brown leather grip. Voopoo’s website states that this grip is actually made of real leather and it definitely feels like it is. The leather grip is embossed with a large DRAG Q logo and also features raised fake stitching around the outer edges of the leather grip. On one side of the body there is a VOOPOO logo. On the other side my unit says SAMPLE, but I believe this will say DRAG Q on the final production model.
On the back of the Drag Q, just under where the pod sits, there’s a large, thick airflow control dial. Above the dial there’s a Gene chip logo and an indicator for which way to turn the dial to either increase or decrease the airflow, indicated by + and – symbols.
This dial is very nice and fun to play around with because it makes satisfying, audible individual clicks when adjusted. The dial is perfectly firm but still easy enough to turn. It works on a stopper and will stop when fully decreased or fully increased. This dial is unique because it adjusts both the airflow and the wattage at the same time, something that I haven’t seen on any other pod vape.
Another neat feature is the gradient LED lighting strip on the front of the Drag Q. With the airflow/power dial turned all the way down, this lighting strip faintly glows from the bottom of the strip. As you increase the airflow/power, the lighting strip gradually lights up towards the top of the strip until it’s fully glowing at max airflow/power. Like the airflow/power dial, this is a unique feature that I’ve never seen on another pod vape. You gotta give it to Voopoo for the innovation here.
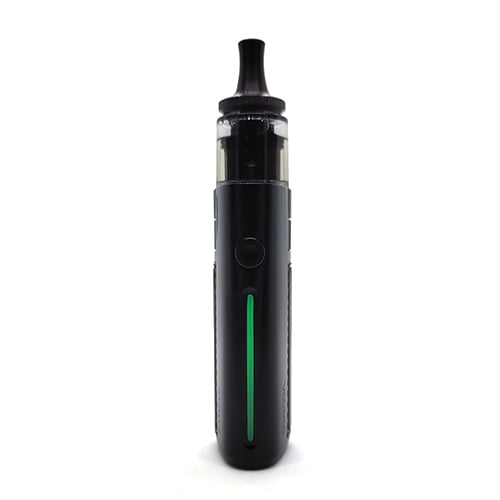
The color of the gradient LED lighting strip also serves to indicate your battery charge level. It will glow green, blue, or red depending on your battery charge.
There’s only a single fire button on the Drag Q. It’s circular, slightly indented, and almost flush with the body of the device. While the Drag Q does have draw-activated firing, I prefer to use the button. The problem I have is that the button is so near-flush with the body that it can be difficult to locate in poorly-lit environments. The shape of the device allows your thumb or index finger to pretty well line up with the button when you hold it, but sometimes I’m not sure if I’m actually touching the button or not. If it was not as flush it would be much better in my opinion.
The paint quality seems to be good on the Drag Q. It’s not fading, chipping, or getting scratched and I’ve used it for about 2 weeks now. The paint is something I always pay close attention to when reviewing Voopoo’s devices; the horrible paint on the original Drag is burned into my memory. Thankfully, the Drag Q doesn’t seem to have a paint issue.
The bottom of the device has a silicone pad to prevent it from slipping around when placed down but I wish companies would stop doing this. All it does is make the device more likely to tip over from the slightest bump.
Pod & Coils
The Drag Q comes with Voopoo’s new tank-style pod, the ITO-X POD. It attaches to the pod with what Voopoo calls a “pinball buckle” design. Basically the outer edges of the pod has three little metal balls and the inside lip of the battery, where the pod inserts, has a groove. When you insert the pod, these metal balls depress and then lock into the groove on the inside of the lip. It’s like a pressure-fit pod but better and more secure. Once the pod is inserted it’s not coming out unless you want it to.
The pod has a 3.5ml capacity and it’s straightforward and easy to fill. The top cap comes off with a quarter turn and there’s a silicone gasket covering the entire top of the fill port. You’ll see three holes: the smallest one is the air relief hole, the one in the center is the chimney where your vapor comes out, and the hole with the droplet icon next to it is the one you fill. The fill hole is also surrounded by a semi-circle of raised silicone.
This fill hole is good for 30ml or 60ml ejuice bottle nozzles but they don’t insert very deep. You have to be careful not to fill too quickly or ejuice will come out of the air relief hole. Otherwise it’s secure and the holes don’t leak, even if you turn the tank upside down.
The top cap has the following written on it: “ADAPT ITO COILS” and “DESIGNED BY VOOPOO”. It’s also knurled around the edges to make removing it easier. The drip tip is a tall, narrow-bore MTL drip tip that is unique to this tank. You cannot replace it with another drip tip.
The pod is nearly clear and has only a very light tint so it’s easy to see how much ejuice is left inside of it.
Two coils come with this kit: a 0.5Ω coil and a 1.2Ω coil. These coils are new for the Drag Q and are called “ITO” coils. A 1.0Ω coil and a 0.7Ω coil are sold separately for a total of four coils available for this device. The Drag Q is mainly meant to be a mouth-to-lung (MTL) device because 3 of the 4 available coils are designated as being for MTL. However, you do get the 1 restricted direct lung (RDL) coil in the box (the 0.5Ω coil).
The 1.2Ω coil is for MTL vaping and it has a wattage range of 8-12W. The 0.5Ω coil is for RDL vaping and has a wattage range of 18-25W.
The coils push-fit into the bottom of the pod but you have to line up the flat sides on the coil with the flat sides on the pod. It’s also a little difficult to push the coils in, to the point where I wasn’t sure if they were being inserted properly or all the way. To save yourself the confusion, these coils do not sit completely flush in the pod when inserted and actually sit a little out and above the flat metal bottom.
How to Use the Drag Q

The Drag Q is a great beginners device because it’s very simple to use. To turn the device on it’s 5 clicks on the power/fire button. From here, take the pod and insert the coil of your choice. If you’re going to be using nicotine salts and want a MTL vape then I suggest using the 1.2Ω coil. If you’re going to be using low strength nicotine salts or regular nicotine ejuices and want a restricted direct lung draw, use the 0.5Ω coil.
Insert the coil by lining up the flat sides on the coil with the flat sides on the bottom of the pod. Make sure the coil is fully inserted and sitting just above the flat metal bottom of the pod. Now you can remove the top cap on the pod by giving it a quarter turn counter-clockwise.
Take your ejuice bottle and insert it into the hole with the droplet icon next to it. The fill hole also has a raised semi-circle around it. Make sure that you fill slow and steady and not too fast or else you’ll have ejuice come out of the air relief hole.
Once you’ve filled the pod, replace the top cap and wait 5-10 minutes for the coil to saturate.
Once you’ve waited patiently (or impatiently), insert the pod into the battery. It might take a little force to get it to click in so don’t be afraid to use some pressure. Now you can vape. The Drag Q automatically locks after 5 minutes of inactivity, so you might need to press the fire button 3 times quickly in order to get it to unlock. Now you can either draw on the mouthpiece or press the fire button to vape.
I suggest setting the airflow/wattage dial to the middle and then working your way to a draw you like. If the draw is too tight or too light, increase the dial towards the + symbol. If the draw is too loose or too strong, adjust the dial down towards the – symbol. It might take some trial and error to find a draw you like but just keep adjusting the dial until you’re happy.
Battery Life
The Drag Q has a 1250mAh built-in battery and charges through a Type-C port on the bottom of the device. Battery life is great, especially when using the 1.2Ω coil. For MTL vaping I vaped over a full pod of ejuice (3.5ml) over the course of 2 days. With the RDL coil the battery lasts only about a day which is still not bad for the size of the Drag Q.
The color of the gradient LED light on the front of the device corresponds to the battery charge of the Drag Q. There are three colors:
- Green: 60-100%
- Blue: 25-60%
- Red: 0-25%
The Drag Q takes only 50 minutes for a full charge.
Performance
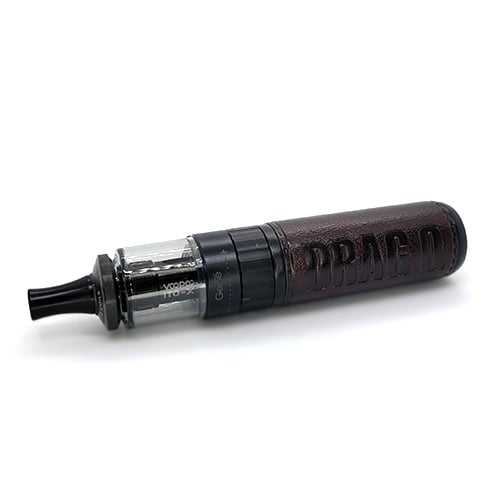
I tested the Drag Q using both of the included coils; the 0.5Ω RDL coil and the 1.2Ω MTL coil. I did not have the other two sold-separately coils on hand for this review.
The 1.2Ω coil is my preferred coil out of the two to vape with. With the airflow/power dial set to minimum I get a tight MTL draw. I used a 35mg nicotine salt ejuice with this coil and the throat hit is nice, even at minimum. But I felt like it needed more power so turning it up to the middle is where it’s at. At the middle setting for the airflow/power the draw is a looser MTL draw but still a pleasant one. The draw is noticeably stronger and that’s exactly what I was going for.
This airflow/power dial all-in-one is great for beginner vapers, no doubt. But I wish that I could achieve a stronger draw with the tightest MTL airflow — that would be my ideal setup with this device. That’s not possible though, so I had to use the looser MTL draw in order to get the stronger draw that I desired. That’s the problem I have with this device.
While it’s not unusable, or even unpleasant by any means, combining the airflow and power into one dial leads to situations like this one. I would have rathered the airflow and wattage adjustment be independent but I still think this is a good MTL device.
NOTE: After writing this review I discovered that you can adjust the airflow independent of the power by holding the power button as you adjust the airflow dial. This allows you to set the wattage higher and then hold the power button and adjust the dial to decrease the airflow. This solves the complaint I had about the wattage being too low at the tightest MTL setting.
The 0.5Ω coil is for restricted direct lung vaping. With the airflow/power dial turned down I get a nice RDL draw that is perfect with lower strength nicotine salts (I used a 20mg salt with this coil). Turning the dial up greatly opens up the airflow until it’s quite a loose draw with a lot of oomph thanks to the maximum wattage of 25W.
Both coils produce good flavor no matter the wattage that you set the dial to. I give the flavor a solid 8. It’s certainly well above average and definitely as good as some of the top pod vapes.
The draw activation is spotty at times so I usually used the power button to vape. I actually prefer using the power button regardless but if you like the ease-of-use of draw activation you’re going to get frustrated, especially if you vape it on the looser airflow settings.
Voopoo devices have a reputation of leaking but the Drag Q did not leak a single drop while I used it, no matter the ratio of ejuice or the coil that I used.
Verdict
The Drag Q is meant to be a device for MTL or RDL vaping and it does well for both. However, I think that its strong-suit is MTL vaping. Very few devices can be excellent at two styles of vaping and the Drag Q is no exception. It’s decent for RDL vaping, above average even, but MTL vapers will get the best use out of this device.
The small and slim form factor makes this an easy device to carry around and the ease of use will be appealing to beginning vapers. Just turn the dial to increase or decrease the power and airflow simultaneously, and then draw on the mouthpiece or press the button to vape. It really couldn’t be much simpler.
With the performance aside, I really liked the gradient LED lighting bar. It’s a unique feature for a pod vape and it just screams “cool” to me. It’s just another reason to pick one of these up and enjoy it for yourself.







What about pod leaking? Is there any problem? Bcs i used drag s pnp x and the leaking is just really frustrating.
I did not have any leaking while I used the device.