

The Wotofo SMRT Pod kit is a new and very interesting pod vape. It comes with the Manik S device, a ‘lite’ version of the Wotofo Manik, which can fire at up to 80W and has a built-in 200mAh battery. But unlike other pod systems, this device isn’t the selling point of this kit; the real selling point is the pod.
The SMRT Pod can be used with Wotofo’s “D Series” coils but it’s also compatible with Vaporesso GTX coils and Voopoo PnP coils! The kit comes with one D15 clapton mesh coil and also comes with a rebuildable coil head and six mesh strips. Building on this coil head is unlike any other rebuildable and extremely simple.
The compatibility and versatility of this kit are certainly attractive. Find out how it performs in this review!
This kit was sent to me by Wotofo for this review.
Box Contents
- 1 x Manik S Battery
- 1 x SMRT PnP Pod
- 1 x D15 Clapton Mesh PnP Coil
- 1 x SMRT PnP Rebuildable Coil Head
- 6 x Cotton Strips
- 6 x Mesh Strips
- 1 x Charging Cable
- 1 x User Manual
Specifications
- Aluminum Alloy Construction
- Size: 117.3mm x 29.2mm x 23mm (with pod installed)
- 4.5ml Pod Capacity
- NexChip Chipset
- 0.96” Display
- Built-in 2000mAh Battery
- 80W Maximum Output
- Type-C Charging
Design & Build Quality


The Manik S battery that comes with the SMRT Pod Kit is essentially a less fancy version of the Wotofo Manik. It looks similar and has a similar shape but it’s significantly more plain. There’s no nice leather/rubber grip or strong metal bezel — what we’re left with is a stripped down Manik that, while it looks okay, isn’t going to win any prizes for the most beautiful device.
The body of the Manik S is made entirely out of aluminum alloy. There are no fancy design lines or exciting curves. The most exciting feature of the design is the ‘MANIK’ in large font across the back. It’s pretty in-your-face branding but I personally don’t mind it. I do wish that it was printed with better quality paint though. My logo is scratched and scuffed and looks just downright terrible now. The paint of the device, however, still looks good as new.
The Manik S is slightly smaller than the original Manik and it’s very light. I like the size and weight but I would be lying if I said that it didn’t feel slightly cheap. Wotofo’s products usually feel very solid but I’m scared of dropping this one and breaking it. Otherwise, it’s relatively comfortable to hold and the weight keeps it easily portable.
At the top of the battery, just outside of the pod connection, are the airflow holes. There are 14 holes per side arranged in 2 rows of seven holes. Disappointingly, there is no airflow control on the Manik S and all of the coils options provide a similar, slightly restricted direct lung draw. What I’ve been doing is covering one side of holes with my finger for more restriction but it’s a pain to have to do all the time.
The buttons are plastic, as is the screen cover. While the button on the Manik was angled, the fire button on the Manik S is completely flat. The adjustment buttons are also flat. The buttons all feel very good and don’t activate too easily. They take a firm push to activate, which I like.
The screen is identical to the screen on the Manik. It displays your wattage, battery level (with percentage), coil resistance, volts, a puff counter, and a puff timer. It’s a nice screen but it’s a little on the dim side.
SMRT Pod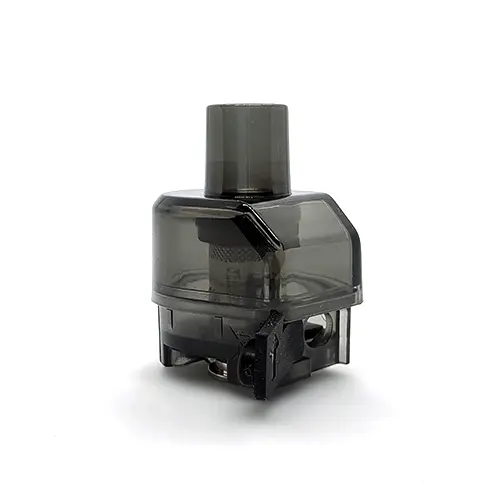
The main selling point of this kit is the SMRT Pod. This pod is compatible with Wotofo’s D series coils (1 is included with the kit), and it’s also compatible with Vaporesso GTX and Voopoo PnP coils. This gives you a wide option of coils to choose from and also lets you use any coils you might have laying around. Coils just push into the bottom of the pod.
Vaporesso’s GTX line and Voopoo’s PnP line of coils are two of the largest and most varied coil line ups out there. There is a coil in practically every resistance you could want and you’re bound to find one that you love vaping with.
Apart from coil compatibility, the SMRT Pod itself is a pretty standard pod. It has a 4.5ml ejuice capacity and is side filled. The pod attached magnetically to the battery and sits firmly without any wiggling or movement. The drip tip on the pod is built-in and non-removable.
The kit comes with one pre-built D15 clapton mesh coil which is good for 45-55W. The kit also comes with a rebuildable coil head, 6 cotton strips, and 6 mesh strips (2 nexMesh Chill, 2 nexMesh Turbo, 2 nexMesh Extreme). This rebuildable coil works a little different than other rebuildable coil heads because it doesn’t have any posts or require any tightening of leads. I will get into this rebuildable coil in more detail a little later on in this review.
How to Use the SMRT Pod Kit
The Manik S is powered by the nexCHIP chipset. This allows the Manik S to fire from 5-80W and to fire instantly when you press the fire button. The Manik S only comes with wattage mode.
Getting started with the SMRT Pod Kit and a prebuilt coil is easy. You can use the included D15 clapton mesh coil or you can use any Vaporesso GTX or Voopoo PnP coils. Take the coil and saturate the wicking ports with a little ejuice. Take note of the wattage range that is printed on the coil because you’re going to need this later. Then take the coil and push it into the bottom of the pod with the flat sides of the coil lining up with the flat sides on the bottom of the pod.
Open up the fill port on the side of the pod and fill it up with your favorite ejuice. If you’re using the included Wotofo clapton coil or another low resistance coil, I would suggest using regular nicotine ejuice. In fact, because of the airy draw of this kit I would not suggest using nicotine salts at all, no matter the coil resistance. Once you’ve filled up the pod close off the fill port and insert the pod. Wait 5 minutes before vaping to let the coil absorb the ejuice.
Once you’ve waited out those 5 long minutes, turn on the Manik S by pressing the fire button 5 times. Set the wattage to the lower end of the wattage range on the coil and vape away by pressing the fire button.
Manik S Button Combinations
- Power ON or OFF: 5 clicks of the fire button
- Lock the Power button & Adjustment Buttons: 3 clicks of the fire button
- Reset Puff Counter: Fire button and down
- Change the Displays Color Scheme: Fire button and up
- Lock Wattage (Will Still Fire): Hold both up and down adjustment buttons
Building the SMRT PnP Coil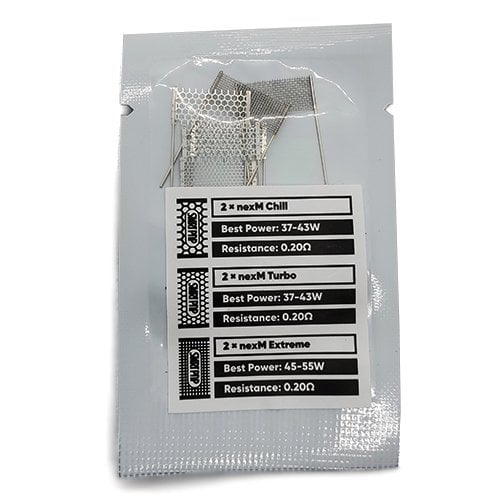
Building on the included SMRT PnP coil is really neat. It’s a totally different experience from building on other rebuildable coil heads because there are no posts and no leads to tighten. By the end of building you end up with a coil that looks and vapes just like a stock coil.
Wotofo provides a pamphlet with building instructions with the kit which you can also find on their website here. However, I’ve gone ahead and provided my own instructions and thoughts on the process down below.
The kit comes with everything you need to build 6 mesh coils, including cotton strips. It comes with the following mesh coils:
- 2 x nexMesh Chill (0.20Ω, 37-43W)
- 2 x nexMesh Turbo (0.20Ω, 37-43W)
- 2 x nexMesh Extreme (0.20Ω, 45-55W)
The nexMesh Chill is a spread out mesh with large, circular holes. The nexMesh Turbo is also a spread out mesh but with smaller holes. The nexMesh Extreme is a fine grid mesh.
Start by taking the mesh coiling tool, the rebuildable coil head, the gold positive pin, a black rubber insulator, a cotton strip, and a mesh coil. You’ll also need a tool to cut your excess leads and a pair of scissors.
 Take the mesh strip and center it on the strip of cotton. You want the leads of the mesh to be facing up.
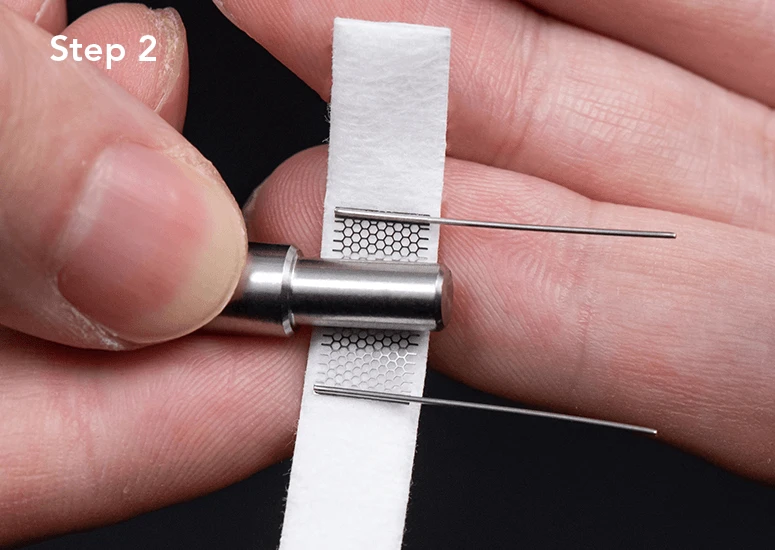 Place the thin end of the coiling tool onto the center of the mesh strip and wrap the mesh and cotton around the coiling rod. You want to insert the coiling rod from the top of the mesh.
 Pinch the cotton tightly and insert the whole thing into the rebuildable coil head by lining up the excess cotton with the slot on the side of the coil shell.
 Insert the whole thing into the coil shell and leave the excess cotton sticking out from the slot. Do not remove the coiling rod.
 If you look at the bottom of the coil you’ll see that the two leads are sticking out. Take the lead that is closest to the notch on the bottom of the coil and bend it into the notch. Leave the other lead sticking straight out.
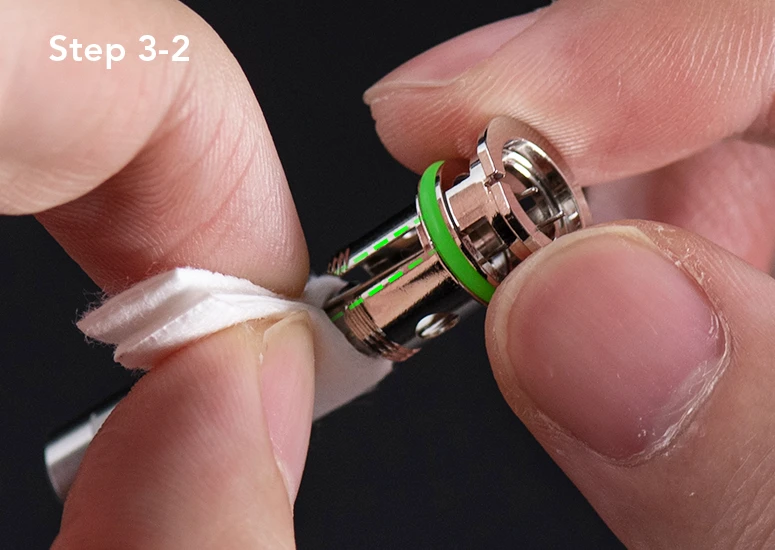
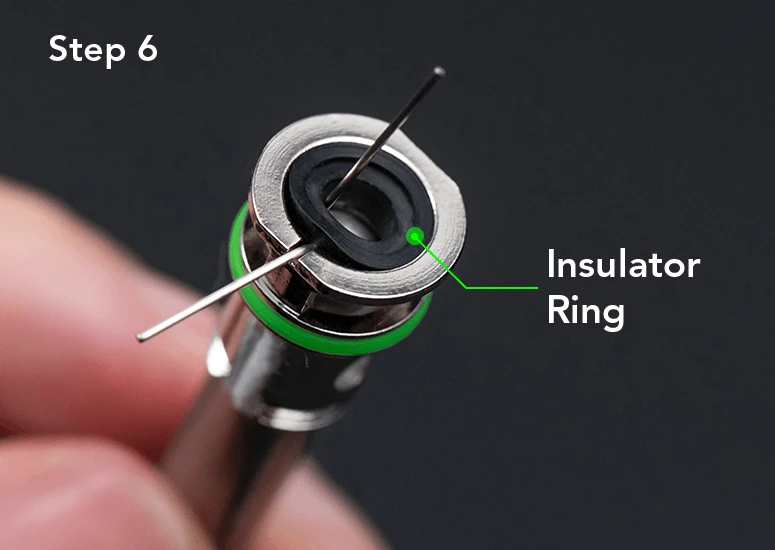 Take the insulator ring and thread the remaining lead through the center. Press the insulator ring down into place.
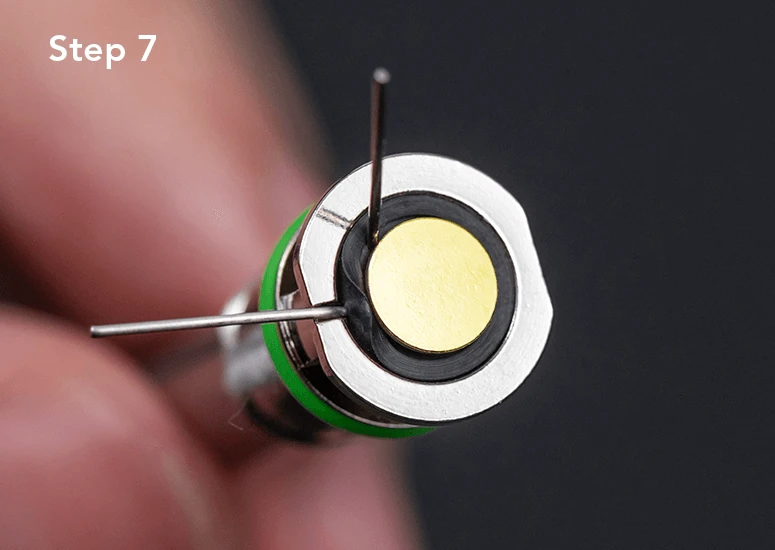 Insert the gold plated positive pin into the center of the insulator ring. You want your remaining lead to go in between the insulator ring and the gold positive pin.
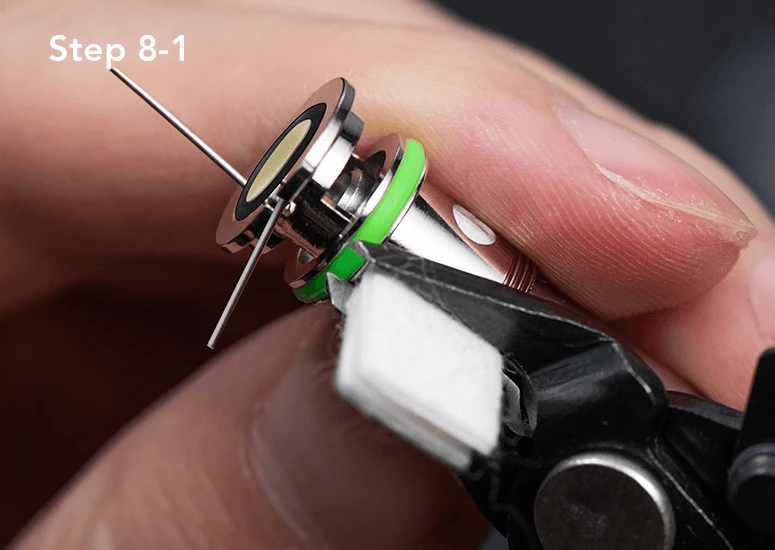 Cut off the excess leads and excess cotton and pull out the coiling rod.
 Screw on the outer coil shell and you’re done!
There are a lot of steps but by using the photo guide that Wotofo provided and reading the description of the steps, it’s a straightforward process. Once you do it once it becomes much easier and a seamless process to perform.
I had a lot of fun with this kit. I’ve built the coil 3 times, once for each type of mesh coil. The best part of the whole process is that once you’re done, you’re left with a coil that looks and performs just like a stock prebuilt coil. In this case, that’s a really good thing because Wotofo’s pre-built mesh coils are very, very good.
Battery & Charging
Battery life is a weak point of the SMRT Pod Kit. Because all of the included coils require 40W+ to really get going, you’re not going to get amazing battery life out of the 2000mAh battery. I’ve been getting just over a day of heavy usage when vaping at 40-50W. Of course, if you use GTX or PnP coils with a higher resistance you can expect to get better battery life.
Performance
There’s a lot to test with the SMRT Pod Kit. I used everything that came included with the kit so that’s the 3 mesh coils and the prebuilt clapton coil. I used a 70VG regular nicotine ejuice with all of them.
The nexM Chill mesh is rated from 37-43W. This mesh is quite spread out and as a result I found that it produced only average flavor. It’s best at 45W but can be pushed as high as 55W without dry hits or performance issues. The vapor is warm at 45W and the draw is nice with decent clouds. This is a mesh coil that I don’t mind vaping with but it’s nothing special.
The nexM Turbo performs nearly identically to the nexM chill. It’s also rated for 37-43W but it can’t be pushed as high above the wattage ratings as the nexM Chill. Flavor is slightly better with this coil owing to the mesh being closer together but it’s still an average vape. I liked to vape this coil at 45W and it’s here that I got the best possible performance.
Totally different from the other two mesh strips is the nexMesh Extreme. This one is rated for 45-55W and it’s a world of difference when it comes to flavor. Anywhere from 50-55W is fantastic with really good flavor. The notes in my ejuice are much more pronounced and noticeably tastier. I get really warm vapor which I like and lots of clouds. Out of the 3 mesh coils this one is the clear winner.
Last but certainly not least is the prebuilt D15 clapton coil. It’s a hard call but I think that it’s even better than the nexMesh Extreme. Flavor is just unreal from this coil; definitely some of the best I’ve experienced from a sub ohm device. This coil handles the upper end of the wattage range really well so I mainly vaped at 55W. I’m really liking this clapton coil so I might even pick up some extras for future use.
The downside to the rebuildable coil and the prebuilt coil is that they leaked; how much depended on how long I kept the pod in without removing it. I had to make a habit of removing the pod every day and cleaning out the bottom of the pod and the battery connection. This leaking happened with 70VG ejuice so it’s not definitely not due to the ejuice being too thin.
Verdict
The SMRT Pod Kit has been a fun and interesting kit to use. The D15 clapton coil and nexMesh Extreme coil both perform very well. I really liked this new take on building a coil. It seems complicated at first but once you get it down once the entire process is a breeze. And don’t forget that you can use GTX and PnP coils with this pod which gives you a world of possibilities for coil choice.
The Manik S performs well but the cheap feel and subpar battery life hinder the overall experience of using it. Other than these two points, this kit is easy to use and extremely versatile. Overall, it’s a solid kit that I really enjoyed using.


I can’t get the smart coil to work, I’ve followed several guides and every single time I do all I get is a low resistance warning on the device. I tried the stock coil and it works fine, I can’t figure out what I’m doing wrong, any advice would be much appreciated.
Are you keeping the leads facing up before you wrap the cotton around the mesh… Step 1 I think this is important…