

The Intake MTL RTA is the latest release in the Intake series from Augvape and Mike Vapes. I’m a big fan of the original single coil Intake RTA and have also used the Intake Sub Ohm tank, which is a very good stock coil tank. I have high hopes for the Intake MTL RTA judging by my experience with the rest of the Intake series.
As the name suggests, this is a tank designed for mouth to lung vaping.
Let’s take a look at the Intake MTL RTA.
Box Contents
- Intake MTL RTA
- Bubble Glass
- 5 x o-rings
- 4 x air plugs (+1 pre-installed)
- 4 x reverse threaded screws
- 2 x Clapton coils (0.8ohm resistance)
- User manual
- Warranty card
Specifications
- Diameter: 24mm
- Height: 54.3mm
- Top to bottom airflow
- Leak proof design
- Top refilling
- Capacity: 3.1ml (straight glass) / 4.6ml (bubble glass)
- Six different sizes of bottom air hole
Design & Build Quality


The Intake MTL RTA comes in a choice of three colors; stainless steel, matt gunmetal or matt black.
If you have used any of the other tanks from the Intake series the Intake MTL will look very familiar.
The drip tip has a distinctly MTL look to it; it’s longer and narrower than your typical drip tip. The drip tip here has a 510 connection, so you can use your own drip tips if you would like to.
The top cap is a bayonet style and is removed with a quarter turn. It has the distinctive ‘Intake’ knurling around the top cap, which serves as both aesthetic design and grip for turning the top cap. The top cap releases nicely, but also sits snugly when tightened into place.
Removing the top cap reveals the fill ports for your liquid. Two good sized, kidney shaped fill ports make it easy to fill the tank, even with larger nozzles.
The chimney section is narrow, with it being a MTL tank.
The airflow control ring has two sets of adjustable holes, still being single sided. It has hard stops at the fully open and fully closed positions.
The two sets of air holes each have five holes of differing sizes, ranging from 1mm to 1.8mm in 0.2mm increments. You can either have all five holes open and close it down hole by hole, or the other set of adjustments let you select just one hole at a time. This really allows you to dial in your preferred MTL draw and, along with the airflow inserts on the deck, give you complete control of your airflow.
The outside of the tank chamber has the Intake branding engraved on it. The inside of the chamber has two holes where the air tubes on the deck fit into, along with the chimney hole.
The straight glass that comes pre-installed on the Intake MTL gives a 3.1ml liquid capacity and swapping to the bubble glass will give you a 4.6ml capacity, which is a large capacity for MTL vaping.
The base of the tank has the Mike Vapes and Augvape logos, and has an adjustable gold plated 510 connection pin.
The build quality of the Intake MTL is very good. All threading is smooth and like previous tanks in the Intake series, it feels solidly built.
The design of the Intake MTL is in keeping with the rest of the Intake series. I like the design, I think it has a classy look which allows the tank to fit with almost any mod you pair it with.
Build Deck


The build deck of the Intake MTL is almost identical to that of the original Intake RTA.
It is a single coil deck which has two tubes running upwards. These tubes bring in air from the top airflow slot and pass it beneath the build deck, where it comes out beneath the coil, giving a top to bottom airflow.
The air tubes are of a narrower bore than on the Intake RTA, to give a more restrictive MTL airflow. Also, where the air then exits the deck to hit the bottom of the coil is a single opening on the Intake MTL, where it had three openings on the original.
The single air opening on the deck comes pre-installed with a 1.4mm air insert. You can swap this out for any of the four included inserts to change the bottom airflow to either 1mm, 1.2mm, 1.6mm or 1.8mm. You could also remove the air insert entirely to give a 3.7mm diameter bottom airflow, if you wanted to use the Intake MTL for a restricted DL vape.
The deck has two Philips head screws which act as clamps on the legs of your coils. These screws are reverse threaded so when tightening the screws down your coil legs aren’t pulled around the screw, which prevents the coil deforming, especially as MTL coils are smaller and more delicate.
The wicking ports on the deck are ample sized and are slightly recessed behind the lip of the deck, giving you something to tuck your cotton behind if you prefer wicking with a dam method instead of poking your wick into the ports.
Building on the Intake MTL


Installing a build on the Intake MTL is really straightforward.
Firstly, loosen the two screws on the build deck (don’t forget they are reverse threaded so clockwise to loosen).
If you’re going to change the airflow insert, do so before installing your coil.
You just insert each coil leg beneath each of the screws, hold in place and tighten the screws down. Adjust the position of your coil afterwards if needed.
A quick dry burn of your coil to check for hot spots, check your resistance and burn off any impurities on the wire.
Insert your wick through the coil, cut to length and thin out and fluff as needed.
I tend to favor the dam method when wicking, pushing my wick tails in towards the center of the deck and letting them fall into place over the wicking holes, instead of tucking them into the wicking holes.
If you tuck your cotton into the wicking holes, just cut it so it doesn’t touch the bottom of the wicking holes. This lets your liquid get underneath the wick tails and will wick more efficiently.
It’s a nice and easy deck to build on.
Performance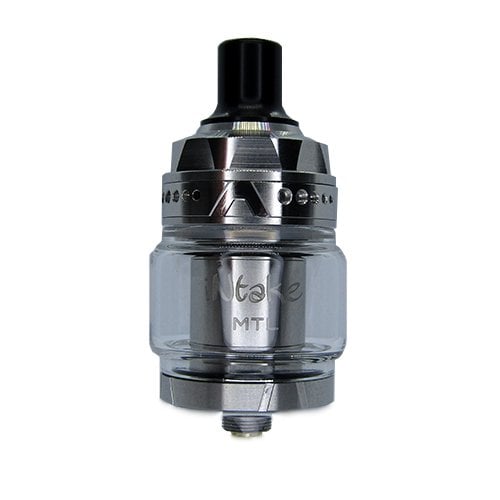
I used one of the included Clapton coils in the build I installed and it came out at 0.71ohms.
I wicked the coil using rayon, which I’ve been experimenting with.
I kept the 1.4mm air insert in the deck, as I’m not a huge fan of really restricted MTL vapes. With the airflow fully open I was able to get a very restricted DL vape which I’m a fan of.
Cutting down the airflow, especially to the single 1mm hole really restricts the draw down, even with the 1.4mm insert, so with the additional inserts you can really tighten it down if that’s what you prefer.
I used 20mg Boulevard Shattered nic salts at 50/50 from Wick Liquor, which I’ve been using in all MTL vapes for the last few months, so I’ve got a good grasp on flavour profile.
I ended up settling at around 19W with the included Clapton coil and the flavor I’m getting is very good.
I’ve been using the Intake MTL as my main daily vape for two weeks now. I’ve paired it with the Grus mod and at 19W with a single 21700 battery I’m getting over two days of battery life before having to swap batteries, which is great for when I’m working.
My build is still vaping well and wicking well, but when it’s ready for a change I’m going to try a simple round wire build, which will allow me vape at an even lower wattage, as I want to see if I can get the same flavor from a simpler build.
Verdict
I love the Intake MTL. It looks great, is well built, easy to build on, vapes great, lots of airflow options from restricted DL to tight MTL, large liquid capacity and the flavour is great.
Paired with the fact the way the airflow system works makes it almost impossible for it to leak, there’s very little to complain about.
The only negative I can come up with is that the airflow inserts for the deck aren’t labelled (maybe on the retail version they will be, but on my sample unit they aren’t), meaning you have to work out which is which by comparing them.
Maybe a subjective point would be that the drip tip shape may not be to everyone’s liking. Typical MTL drip tips have a curve to them, but I found the included drip tip to be comfortable to use.
Other than that, for me this is a perfect MTL tank.


Add comment