

Hellvape are responsible for some of the best and most popular rebuildable tanks out there, with their Dead Rabbit series of tanks perhaps being the most well-known. Members of this series include the Dead Rabbit V2 RDA and Dead Rabbit V2 RTA. We reviewed both of these tanks and our sentiments were generally positive, especially for the V2 RDA.
Well, you could have seen this coming from a mile away, but Hellvape has just released their latest Dead Rabbit RTA — the Dead Rabbit V3 RTA. It’s still a top airflow tank with honeycomb airflow but the deck has been tweaked and redesigned for better flavor.
Sadly, the “bunny ear” posts are gone and instead the Dead Rabbit V3 RTA now has a postless build deck. We’ll see if this is better or worse than the previous deck design on the V2. The V3 RTA has a 25mm base diameter and will hold up to 5.5ml of ejuice with the bubble glass installed.
Is it better than the V2 RTA? Is it worth picking up at all? Read my full review to find out.
Box Contents
- 1 x Dead Rabbit V3 RTA
- 2 x 0.37Ω Ni80 Clapton Coils
- 2 x Shoelace Cotton
- 1 x Bubble Glass
- 1 x Coil Leg Measuring Tool
- 1 x Accessory Bag
- 1 x User Manual
Specifications
- Size: 25 x 50.5mm
- Connection: Gold Plated 510 Pin
- Coils: Dual or Single
- E-liquid Capacity: 3.5ml (5.5ml w/ Bubble Glass)
- 810 Drip Tip
- Quarter-Turn Open Top Cap
- Adjustable top airflow
- Internal Honeycomb Airflow + Slotted Airflow0
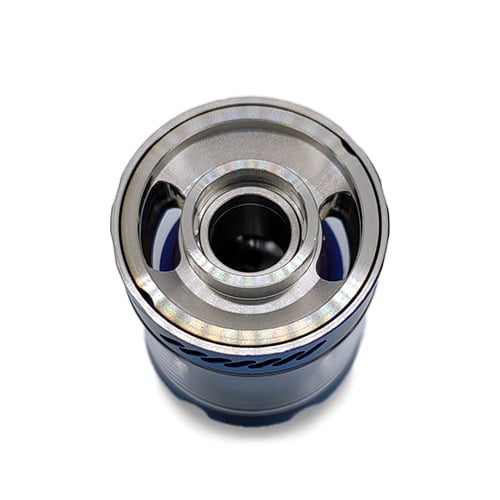
- Postless Build Deck
Design & Build Quality


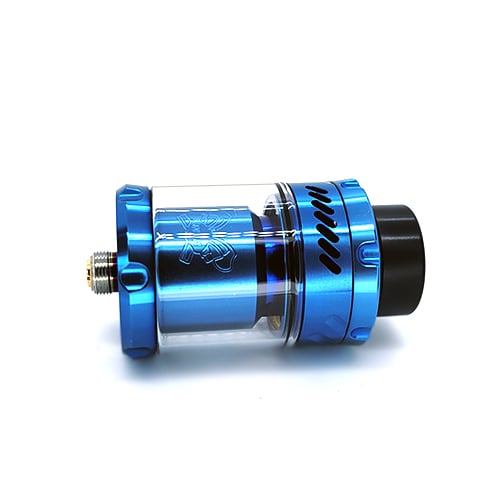
A lot has changed from the V2 to the V3. It’s still a similar looking tank but Hellvape has made many small changes to the design that, in my opinion, make for a better looking tank. Before I get into those changes though, let’s talk about the general specs. The Dead Rabbit V3 RTA has the same dimensions as its predecessor with a 25mm diameter (with the straight glass) and a height of 50.5mm. However, while the base diameter is 25mm, it actually flares out a bit higher up on the base out to 27mm. Basically, the Dead Rabbit V3 RTA will overhang on any mod with a top width of less than 27mm.
The Dead Rabbit V3 comes in 8 colors: stainless steel, matte black, matte full black, gunmetal, gold, rainbow, blue, and purple. It looks like the matte black has a silver dead rabbit logo while the matte full black has a subtle, barely visible black logo. I’m using the blue color for this review and personally, I think it’s the nicest color that they offer.
Holding the Dead Rabbit V2 and V3 side by side, it’s easy to see the aesthetic changes. For one, the V3 has these circular indents that run all along the edge of the top cap. It’s more than just for design though as these indents add some grip to remove the top cap, which comes off with a quarter turn. The top cap is secure when closed but the threading is smooth when you remove it. Underneath the top cap are two large kidney shaped fill ports that sit in a concave channel. This ensures that any excess ejuice won’t spill out and instead will funnel down into fill ports.
Another design change is the airflow slots. There are 7 small diagonal slots for airflow. These slots are rounded at the top and bottom. The airflow is on a stopper and can be fully closed, fully opened, or you can close any number of slots. It’s a little tight but the airflow control rotates smoothly.
Two glasses come in the package: a 3.5ml straight glass and a 5.5ml bubble glass. I’ve always liked the look and extra capacity of bubble glass but if you want a more straight and streamlined look then you can always use the straight glass.
The barrel inside of the tank (the portion that goes over the deck and coils) has an engraved Dead Rabbit logo on it, as well as the words “Dead Rabbit 3”. Since the logo and wording are the same color as the barrel it’s hard to see them unless you really look but I like the subtle branding.
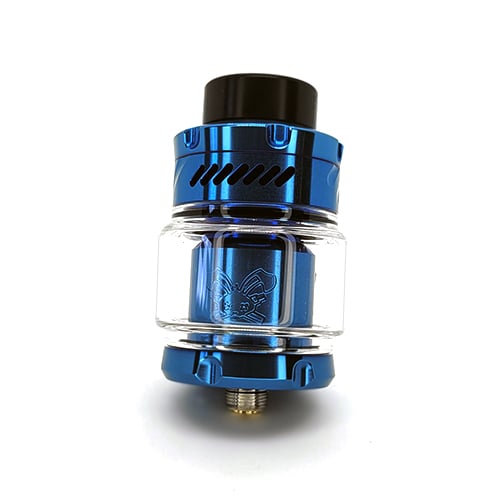
As you would expect, this tank has an 810 drip tip. No matter what color you get they all come with a black drip tip. It’s low profile and wide bore with quite a bit of thickness which I find to be perfect for this tank. The o-ring is in the top cap and not on the drip tip so you can switch this one out for another drip tip if you so wish.
As I mentioned earlier, the base of the tank is 25mm but flares out to 27mm. Like the top cap, it has the same circular indentations all along the base of the tank.
Overall I think that the Dead Rabbit V3 is even more attractive than the V2. I wasn’t a big fan of the celtic knots on the V2 so I’m glad that they did away with those here. The circular indents and light machined lines look great, as do the rounded off diagonal airflow slots. The build quality is also very good, with all of the threading being very smooth and the fit and finish are excellent. So far so good for the V3.
Airflow
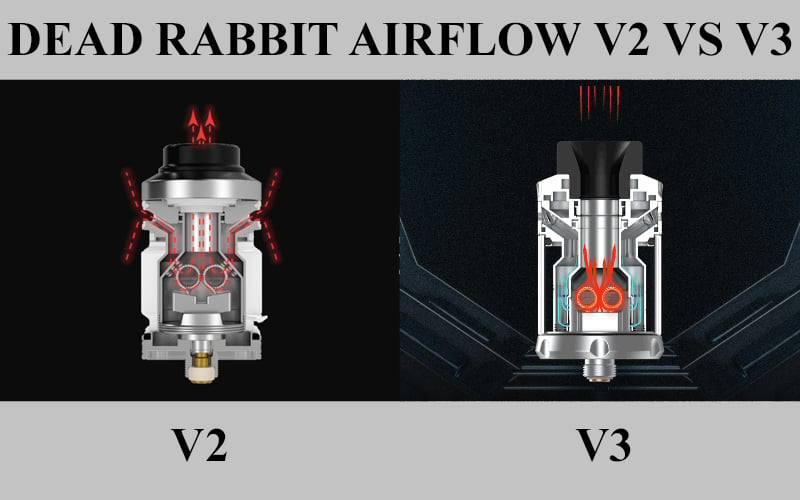
When talking specifically about the Dead Rabbit RTA’s, the Dead Rabbit V3 has a completely new airflow system. It’s not new to RTAs, but it’s certainly new and different from previous tanks in this series. If you ask me, it’s a big improvement too.
People frequently criticize top airflow RTAs for not being as flavorful as bottom airflow RTAs, and for the most part they’re right. The way the airflow channels from a bottom airflow tank and then hits the coils does result in better flavor. However, if you design a top airflow tank right then it can definitely be every bit as flavorful as a bottom airflow tank but with the added bonus of leak resistance. As it so happens, the Dead Rabbit V3 has a well-designed top airflow system. Let me explain.
You see, the Dead Rabbit V2 RTA was a decent tank for sure, but it definitely wasn’t the best RTA for flavor. This all came down to the airflow design. With the Dead Rabbit V2 RTA, the airflow was directed down from the top airflow slots through isolated channels that lead to the coils, but the issue was that these channels ended at the top of the coils. This meant that airflow would hit the top of the coils and then go out the drip tip and to your mouth.
The Dead Rabbit V3 RTA fixes this issue. It has a similarly isolated top airflow channel that leads down to the coils, but instead of stopping at the top of the coils, the airflow is forced through the honeycomb airflow that surrounds the bottom and sides of the coils. This means that the air has to hit the whole coil before exiting out the drip tip and this results in much better flavor. Dare I say, flavor that is just as good as many bottom airflow tanks.
It’s a really great airflow design and it’s surprisingly quiet and smooth too. Because of the channels, this tank delivers a slightly restricted direct lung draw even with the airflow fully open; something that I don’t mind at all. It’s a really nice draw. Closing down the airflow obviously restricts the airflow further and you can get a very restricted DL draw by closing it all the way down. However, the vapor gets much much hotter so it’s not the way that I liked to vape this tank. Closing down just a few airflow holes resulted in the best draw and warmth of vapor for me.
Building on the Dead Rabbit V3 RTA


Building on this deck is relatively simple and straightforward but the V3 now has a postless build deck as opposed to the bunny-ear build deck that the Dead Rabbit series is known for. I’m a bit sad that they did away with the bunny ear posts but this postless build deck is still pretty good. Not as easy as “drop your coils in and trim the leads afterwards” but still easy enough with the tools that are included in the box.
In the box you get two Ni80 coils, two pieces of agleted cotton, a screwdriver, extra screws, extra o rings, and a piece to measure the length of your coil legs. Getting the right length for your coils is one of the keys to getting good flavor from this tank so make sure you use this tool.
I found that trimming my coil legs to 5mm was the best for this deck. What I like about this coil leg measuring tool is that it has 4 sets of holes per step instead of just two and it’s also curved to nicely seat your coil. This lets you get more accurate measurements over flat stepped tools and ensures that both coil legs are cut to the same exact length.


The build deck is a postless deck with walls that will sit around the sides of your coils. These walls have holes in them for the airflow to pass through so trimming your coils to 5mm will ensure that they sit in the best position to be hit by the airflow passing through.
With your coils trimmed, loosen the screws and seat your coils down as far as the legs will allow. Then tighten the screws and position the coils towards the middle while ensuring that they don’t touch each other.
At this point I like to dry burn the coils and strum them with my ceramic tweezers to work out any possible hot spots. If you’re using the included coils then you can pulse them at 25W to work out the hot spots. When the coils are glowing evenly you can give them a minute or two to cool down and then move on to wicking.


You want to cut your wicks so that they fully plug up the wicking ports but you also don’t want it to be too tight or to have too much cotton hanging down. I cut my wicks a little longer than the edge of the build deck and then combed them out to thin them a little.
My wicks plugged up the wicking holes fully but were not so tight that I had to struggle to get them in there. This is how you want it to be. If you’re struggling then you have too much cotton and should either comb it out more or cut some excess cotton off the ends.
Performance
The Dead Rabbit V3 is definitely an upgrade from the V2 and it all comes down to the airflow and build deck. Sure, it’s not the same bunny ear style deck that we’ve come to know and love from the Dead Rabbit series, but the way that the airflow hits the coils makes the performance much closer to a bottom airflow tank than you would think possible.
Because the airflow travels all the way down the tank and is then forced around the bottom and sides of the coil, flavor is really good. I actually forget that I’m using a top airflow tank most of the time because the flavor is so great. When installed, the included coils come out to 0.17Ω and I vaped anywhere from 70-80W.
I tended to keep the airflow either wide open or with 2 or 3 slots closed. At 80W the vapor is warm, verging on hot, and it’s overall just a really great draw. As long as you position the coils correctly you’ll get great flavor and solid performance from this tank.
This is a top airflow RTA so this almost goes without saying but the Dead Rabbit V3 RTA does not leak at all — there’s nowhere for it to leak from.
Verdict
There was definitely room for improvement with the Dead Rabbit V2 RTA and Hellvape has made the necessary changes to make the Dead Rabbit V3 RTA everything that you would expect from a tank in the Dead Rabbit series. This RTA is the best of both worlds; leak resistance of a top airflow tank with the flavor of a bottom airflow RTA.
There’s very little to complain about or to fault this tank for. Sure, the bunny-ear style deck that made building so easy is gone, but the postless deck is still a breeze to build on if you trim your coil legs to 5mm. Wicking plays a big part in the performance too (show me a tank where it doesn’t!) but it’s simply a matter of trial and error. You figure it out quickly enough and the performance is worth the little bit of trouble.
The Dead Rabbit V3 RTA is one of the best top airflow tanks out there and it’s even one of the best RTAs available. If you’re in the market for a new RTA then I can easily recommend picking one up.


pg offgasses formaldehyde at 470F.
this is why i avoid hot vape. think i was hooked on the formaldehyde for a minute. nasty molecule.