
As Vapers seek something new and easy to build, the choice presented in mesh RTA’s is growing significantly. Are there advantages to using mesh over traditional coils? Most definitely. Is the Kylin M Pro RTA for you? Well, the true answer is… It depends. Vandy Vape has Produced the Kylin M Pro RTA as a new and upgraded version of the popular Kylin M series. This series is famed for decks that make building a breeze and great performance that offers concentrated clouds and plenty of flavor.
How does the Vandy Vape Kylin M PRO RTA stack up against its predecessor? Well, you are about to find out. Today we put this beast of a tank through its paces so that you can decide for yourself whether it is the one for you.
Box Contents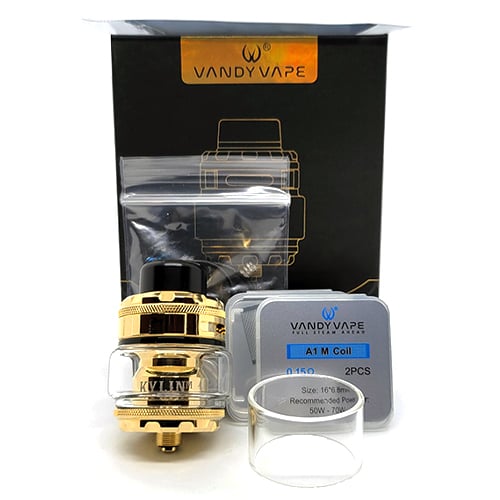
- 1 x Kylin Pro M RTA
- 2 x Vape Cotton Laces
- 1 x Pyrex Glass Tube
- 1 x Bubble Glass Tube
- 1 x Instruction Manual
- 1 x Accessory Bag
- 2 x A1 M Coils 0.2Ω
- 2 x A1 M Coils 0.15Ω
Specifications
- Height: 33.3mm (not including drip tip)
- Diameter: 24.2mm
- Drip Tip: Black Resin
- Capacity: 6ml/8ml
- Filling method: Top fill
- Airflow Type: Top airflow
- Coil Type: Mesh
- Insulator material: PEEK
- Threading: 510 thread
Design and Build Quality


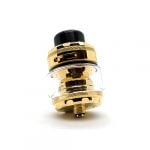
On opening the box, I was impressed with the visuals. The tank I tested came in an eye-catching (and very shiny) gold color. Aside from gold, there are a further five colors available for the Kylin M Pro RTA; stainless steel; matte black; frosted grey; rainbow; gunmetal. The thing that stands out at first glance is the size of the tank. With the belly glass fitted, it is huge! Even with the 6ml standard cylinder, it still looks pretty substantial.
Let’s start from the top and work our way down.
Regardless of which color option you go for, you’ll find a wide bore, black 810 resin drip tip. This can be removed, so if you have a ‘favorite’, you can swap it out. The drip tip isn’t the shortest we’ve seen and adds to the height of the tank.
The top filling ring is both beveled and knurled. This is a really nice feature as it makes gripping it to remove and fill really easy. Those who have tried tanks such as the OFRF Gear will know just how slippery those top caps can get if they have even the faintest amount of ejuice residue.
Underneath the top cap, you’ll find a ridged airflow ring. The friction and tolerances are perfect. It isn’t loose enough to move accidentally, nor is it so rigid that you end up unscrewing your tank inadvertently. It rotates through 90° exposing two long (but narrow) airflow holes 180° apart.
The adjustable juice cap and the main body of the tank are particularly noteworthy. On opening, I was impressed with the size of the filling holes.
And there’s more.
The filling holes are actually located about ¼ of the way into the tank, with a substantial amount of ‘room’ above. This is great for a couple of reasons. First, you won’t need to be too careful with your ejuice bottle nozzle. Essentially you can supply your juice straight into the top and let it flow down through the spacious filling holes. Second, the post of the tank runs up high enough above the filling holes so that you actually get quite a lot of extra juice capacity. When I tested this, it added around 2ml, so you can have ejuice stored above the glass when full.
Finally, the build deck. As with the top filling ring, the base of the build deck is exquisitely gnarled, so it is really easy to screw on and off your mod.
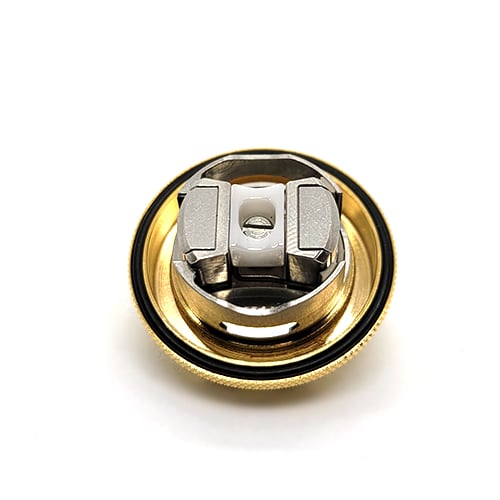
As for the deck itself, those of you who regularly build using mesh will be familiar with the layout. You’ll find two sizeable clamps ready to trap your mesh, two relatively large juice wells with really large inlet ports, and a spring-loaded insulator that will push your cotton up into your arced coil.
The base of the deck has a 510 pin. This protrudes enough to make contact with a mech mod or a hybrid.
The entire tank feels absolutely rock solid. There was zero play in any of the parts, and the threads feel crisp and tight. There is no danger whatsoever of cross-threading, and overall it is one of the most solidly machined tanks I’ve seen.
How to Build on the Kylin M Pro RTA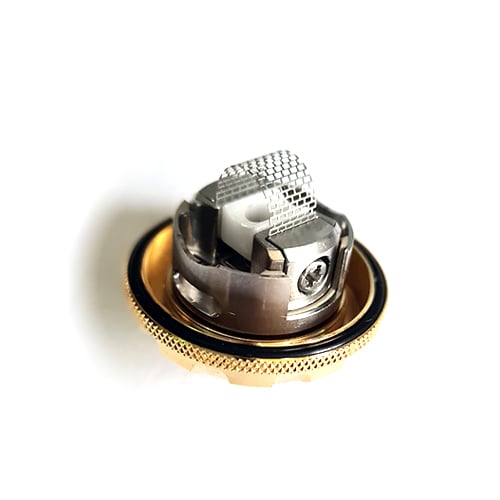
Putting coils into most mesh builds is pretty easy, and the Kylin M Pro RTA is no exception.
In the box you’ll find a small metal rod (nice touch, as they are usually plastic, the circumference of which is perfect for bending your mesh coil around.
Once you have got your coil nicely shaped, it is simply a matter of inserting the inverted ‘U’ shaped coil into the two clamps on the deck and then screwing them tight. From here, all you do is give them a rapid series of ‘dry burns’ on very low wattage (I normally use about 15.0 Watts). The aim is to identify any kinks or imperfections that will lead to hot spots. Try not to keep them glowing. A quick flash is fine. There should be no need to stroke or brush mesh coils. If you do, you risk warping them. This will lead to hot spots.
Now, all that is left to do is wick your coils. And here is where I had a bit of an issue.
Wicking
I’ve had plenty of experience wicking mesh coils, but I found this a little problematic on the Kylin M Pro RTA for a couple of reasons. The fact that I feel the need to detail how to get it wicked right from my own trial and error should illustrate that this RTA can be a pain to nail down.
As with any mesh RTA you’ll need to use plenty of cotton. I found the included cotton laces were overkill. You could just about fit them through, but the tension was such that I was in serious danger of warping the edge of the coil. You’ll need to tear off around ¼ to get it about right. The aim is to go for a snug fit, not a tight fit. It helps if you use the hard plastic section of the cotton lace to push the central insulator down.
One downside of mesh RTAs is their ability to suddenly give you a dry hit, and on my first attempt, I managed to achieve exactly that. Here’s the solution to avoid it.
I always, always, use the ‘dam method’ to avoid dry hits.
It goes like this: once you’ve got the cotton through, trim it flush with the juice channel and thin it out slightly with tweezers. Cut it again to get a nice straight edge, and then fluff it so you have a bow-tie shape. Using your tweezers, push the cotton towards the coil, but not into the juice holes. You’ll find that the bottom half naturally falls into the holes on its own and hangs pretty loose. This is exactly what you want.
That’s right, any talk of ‘stuffing’ or ‘pinching’ or ‘jamming’ just isn’t going to work. Remember, this tank is specifically designed so as to not leak, so you don’t need to clog up the juice well.
You should have the lower half of the cotton just sitting inside the juice holes, with the upper section still looking pretty fluffy. Now here is another key bit.
You want to trim the upper cotton at 45°, going away and down from the coil (there is a diagram in the instruction manual). Once you have done this, try and trim away as much cotton above the coil as you can…
I’ll explain why shortly.
From here, you’ll have to do the standard with mesh wicking; juice your coil up, and then juice it some more. You want it saturated before screwing the top cap on. There’s a lot of cotton in the build. I find a great way to ensure it has penetrated all the way through is to pulse the coil as I apply juice. Once it stops absorbing, you know you are good to go.
Mesh Coils
The Kylin M Pro RTA comes with two different types of coils included. Both are A1 Kanthal meaning this is strictly for wattage mode only. The coils come in 0.15 Ω and 0.2 Ω. The lower resistance coils have a slightly finer mesh compared to the higher. In terms of performance, there was a difference, but so small as to be negligible.
I found the 0.15 Ω coil to offer a slightly hotter vape, but with regards to flavor, it was practically identical. The 0.2 Ω was definitely my sweet spot. I found that I could run this right at the bottom of the suggested power range 40 – 60W and still get a nice saturated vape with plenty of flavor.
In the interest of posterity, alongside the fact that I’m a true builder and want to ‘make’ my own coils, I also gave Vandy Vape’s SS316L wire a blast. This mesh wire is much finer and comes on a 5 ft ribbon. I normally use it when I decide I want to try temperature control.
This build came out at exactly 0.22 Ω. And I must say I was blown away by the result (once I’d nailed the wicking). The vape at 230°C and 45W was pretty much perfect.
Performance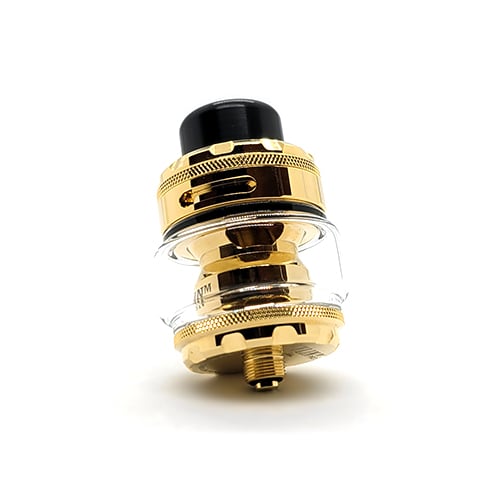
There are things to love about the Kylin M Pro RTA, and there are also things I wish were a little better in terms of performance. Let’s be positive and start with the good things.
The flavor and density of the clouds were exactly what I look for in a mesh RTA. My go-to juice is vanilla-based custards, which is my standard ‘test’ control. Both the stock coils provided a warm, moist, and flavorful inhale. Even at a wattage towards the bottom of the scale (40 Watts), the vape was still on the warm side. The airflow is pretty spot-on for DTL vapers, with just enough resistance to pull against without feeling too restrictive.
When I closed the airflow a half turn, I was equally impressed. The vape was a lot warmer, but this seemed to intensify the flavor. I’d go as far as to say I could almost feel the cloud coating my mouth.
I’m glad of the huge capacity in this tank for a couple of reasons. First, with the 8ml bubble glass, you can ‘fill and forget’. No need to be carrying a spare bottle around. Second, this tank needs a huge capacity. It can be a little thirsty, but that’s expected with such dense clouds.
So far, so good, right?
Now, this is an honest review, so let me tell you the downsides.
First, the wicking. You have to be meticulous if you want this to work. My first build gave me a dry hit almost immediately. Ok, that was my fault, but here’s why and it won’t tell you this in the instructions.
You have to trim any and all cotton above the coil.
Why?
This is a top airflow RTA and the air holes at the top feed directly down onto the coil. If the chamber directly above the coil is full of cotton, the air can’t get in. This will be a guaranteed dry hit as the coil heats up pretty quickly without the air from above to cool it.
Speaking of the airflow, while it gives a very nice draw, it is one of the noisiest tanks that I have encountered. You do get that turbulent hiss whenever taking a large pull. That said, I tried the airflow ring in many different settings, none of which gave any hint of whistling, which is always a relief.
My final gripe, which is very minor and comes with a caveat, is that this is quite a large tank. It won’t pair well with smaller mods. I run a 25mm box mod, and while the spec states the tank is 24.2mm; this is the base measurement. With the tank attached, there is an overhang, even with the standard cylindrical glass fitted.
The caveat?
Well, it’s a trade-off. Sure, this is a big tank, but you get a lot of ejuice capacity. Chances are, if you are running the Kylin M Pro RTA, you’ll have a larger mod to back it up as most mesh requires significant power to perform well.
Verdict
As far as mesh tanks go, the Kylin M Pro RTA offers a great deal. You’ll get superb build quality, a rich and thick vape, and a tank that makes coil installation easy. Not to mention capacity that should last for the day. Overall, I really like it.
Vandy Vape hasn’t solved the issues that plague nearly all mesh RTA’s, namely that it is a little tricky to wick, and the size won’t be for everyone. All that said, if you are willing to spend a little time experimenting with the wicking and take your time, you’ll be rewarded with an RTA that gives great results. Is it worth it? Absolutely.
What are your thoughts on the Kylin M Pro RTA? Let me know in the comments!


i dont understand why they ditched the honeycomb airflow, that would of fixed your issue with the loud draw, and it imo was part of the reason why I thought the original kylin m rta was the best mesh rta at that time.
Hi All. Does anybody know if the original Kylin Mesh airflow ring will fit on the new Kylin Pro RTA? I have the original and the only reason I dont use it is because it’s very noisy compared to the Profile Unity or the Zeus X Mesh (the finest RTA I’ve owned to date) so I ordered the new Kylin M Pro last week without doing much research only to read that it’s even louder than the original.
Thanks.